Cisco Meeting Server is a Secure on-premises Video Conferencing solution that is easy to configure and for that, you just need to have some understanding of CMS components. Most new users get confused with what all is required to know and configure. In this blog, we will cover the deployment models and basic configuration to set up components.
CMS comes with hardware as CMS 1000 and CMS 2000. CMS1K and CMS2K are basically UCS-B servers. CMS1K is the UCS-C220 server and CMS2K is the UCS-B200 server. You can refer to the datasheets provided by Cisco for more details.
Based on Hardware, you can scale your HD calls per second.
CMS1K supports 30 x 1080P 60 fps calls, 60 x 1080p 30 fps calls, 120 x 720p 30 fps calls.
CMS2K supports 218 x 1080P 60 fps calls, 437 x 1080p 30 fps calls, 875 x 720p 30 fps calls.
You need to understand the deployment models and finalize the architecture you want. For this, you need to understand your environment first and then decide what deployment setup out of below you want in your environment.
Single Combined Server Model
In this architecture, you basically deploy one Cisco meeting server with all features available. Deploy this model with Cisco Expressway Pair.
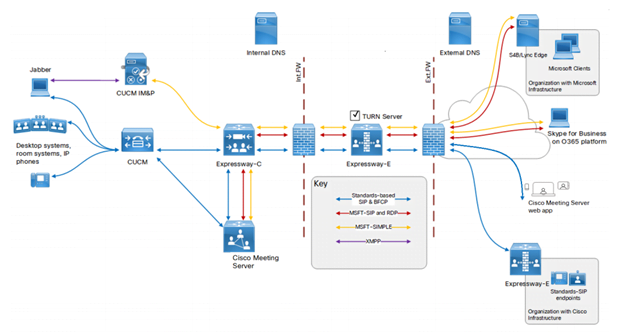
Expressway Edge server will act as edge server placed in DMZ in your environment. Connect Expressway Core with CMS and CUCM with CMS.
Scalable And Resilient Server Model
In this architecture, you deploy multiple CMS in high availability. The architecture enables you to expand as your Video conferencing requirement grows. Call capacity can be increased by adding more Meeting Servers. In this clustering, the call bridges will increase the conference capacity. These Meeting servers can be in the same location or different geographical locations. While configuring the model, you need to make sure that load balancing across call bridge groups is properly configured.
There are two layers to the Cisco Meeting Server software: A Platform and an Application.
The Platform is configured through the Mainboard Management Processor (MMP). The MMP is used for low-level bootstrapping, and configuration via its command-line interface. For example, the MMP is used to enable the Web Bridge, Database clustering, and various other components.
The Application runs on the MMP platform. Administration of the application level (call and media management) can be done via the Call Bridge’s Web Admin interface or through the Application Programming Interface (API) if you prefer. The API uses HTTPS as a transport mechanism and is designed to be scalable in order to manage the potentially very large numbers of active calls and spaces available in a deployment.
Cisco Meeting Server Installation
Cisco recommends the UCS platform for the Cisco Meeting Server. You can download the ova file from software.cisco.com. Deploy the VM OVA Template. After the deployment is over, open the server console and log in. The default CMS login/password is admin/admin. The system will prompt you to change the password.
The below 9 steps are the basic requirement for CMS which you will need to do everywhere and set up basic Webrtc.
1. Assign IP Address and gateway
ipv4 a add x.x.x.x/y z.z.z.z
Where x.x.x.x represents IP Address, Y represents subnet and z.z.z.z represents Gateway
For example: ipv4 a add 172.16.1.2/24 172.16.1.1
2. Configure DNS IP and domain
Then you need to configure DNS.
Dns add forward zone <IP Address>
Dns add domain <domain name
3. Add NTP Server address
Then configure NTP –
Ntp server add <IP Address>
4. Change default time zone
Change time zone as per requirement.
Timezone < >
5. Licensing
Cisco will map the mac address with the license and share a license file. Rename the file to cms.lic
The next step is to put the cms.lic file in CMS. Use WinSCP for this.
6. Configure Webadmin
Webadmin will enable the GUI application access. To enable this, you need either self-signed or CA-signed certificates. Use the below command to generate CSRs.
pki csr CMS CN:<SERVER FQDN (SHOULD be in SAN as well)> subjectAltName:<domain of users>,<webrtc JOIN url>, <Server FQDN> <other Server FQDN if any>
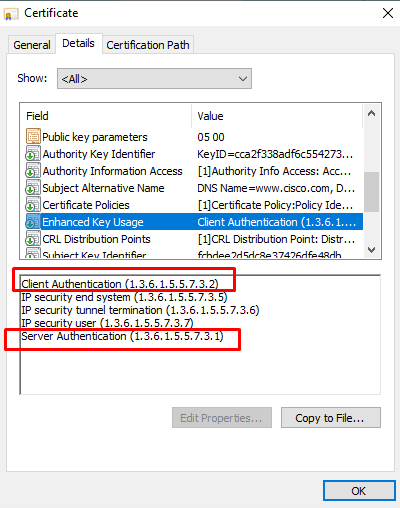
Note – Server Certificates must have SAN entries and Server and client authentication keys under the Enhanced key usage section. Check with your CA Administrator as this is required.
Once you have webadmin certs and root certs uploaded in CMS. Then configure certs and enable webadmin. It is recommended that you change webadmin GUI interface to use a port other than 443 as that will be used by clients for Webrtc purposes.
Webadmin listen a 445
Webadmin cert cms.key cms.cer root.cer
Webadmin restart
Webadmin enable
Now your webadmin page will open on 445 port.

7. Configure XMPP.
XMPP handles registration and authentication from CMA/Webrtc clients. Everything registers to XMPP server such as Callbridge
The XMPP service in CMS is used to handle all registration and authentication for Cisco Meeting Apps (CMA), including the web-based WebRTC CMA client. The Call Bridge itself also acts as an XMPP client for authentication purposes and will therefore need to be configured as other clients.
To configure use below commands –
xmpp domain <domain name>
xmpp certs cms.key cms.crt root.cer
8. Create Call bridge
The Call Bridge is the one service present in every CMS deployment. The Call Bridge is the main conferencing engine. It also provides the SIP interface, so that calls can be routed to/from it from external call control, such as the Cisco Unified CM.
xmpp callbridge add CFBCMS
callbridge listen a
callbridge certs cms.key cms.crt root.cer
callbridge restart
Copy the secret key.
Now got to Web Interface–
Configuration > General
Put unique call bridge name in GUI with password (Secret key) and name (CFBCMS) > submit
Server address – Where should this callbridge register to? If you have multiple XMPP, then let DNS srv do the job. If you have only one, you can leave this blank
SRV record required is –
_xmpp-component._tcp.<domain> port 5223
Create as many as srv with priorities to configure XMPP High availability.
Click Submit
9. Webbridge (handling WebRTC/CMA)
If you plan to allow users to access their Spaces in Cisco Meeting Server via a browser, then you will need to configure the Web Bridge. It is the server role that enables users to manage and connect to their Spaces as well as allow outside participants into conferences using only a WebRTC-enabled browser.
Use below command line –
webbridge listen a:443
webbridge http-redirect enable (will redirect users from port 80 to 443)
webbridge certs cms.key cms.crt root.cer
webbridge trust <callbridge cert> (Command will enable join button but you also need to tell callbridge which webbridge to trust)
Go to GUI > Configuration > General
Under webbridge settings
Guest account client uri – <https:// join.cms.domain.com>
Guest account JID domain – Domain name
Note – If you are using Expressway pair in your environment then your Expressway E needs to be signed by Public CA. If not, then you need to sign Webbridge certificate with Public CA so your WebRTC page opens on HTTPS and does not give you a “Your connection is not private” error.
After you follow the above steps, then you have completed the basic setup for CMS and Webrtc.
Now, if you have queries against database and API configuration. Stay tuned for the next article which will cover clustering of XMPP, database, Callbridges, and API configuration.
We hope this article gives you an understanding of the Cisco Meeting Server Basic setup. If you are looking for consulting, advisory and professional services to deploy a Collaboration Environment for your organization and other services too then our techs at Zindagi can help.
Zindagi Technologies Pvt. Ltd. is an IT consultancy and professional services organization based out of New Delhi, India. We have expertise in planning, designing, and deployment of collaboration environments, large-scale data centers, Private/Public/Hybrid cloud solutions, and believing in “Customer Satisfaction”, we make sure that all the requirements are fulfilled from our side. You can contact us on our number +919773973971.
Author
Rahul Bhukal
Sr. Collaboration Consultant