What is DNS?
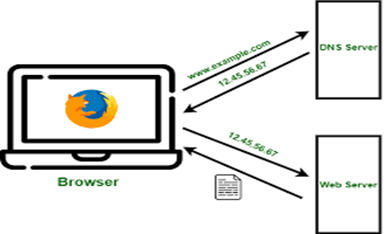
The Domain Name System (DNS) turns domain names into IP addresses, which browsers use to load internet pages. Every device connected to the internet has its own IP address, which is used by other devices to locate the device.
How DNS works?
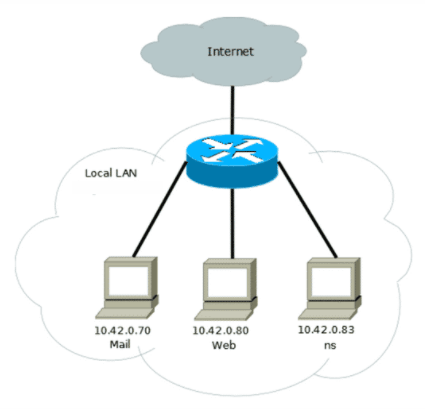
In the first step DNS resolver, also called recursive resolver designed to receive DNS queries from a web browser and other applications. The resolver receives a hostname, for example, www.zindagi.com, and is responsible for tracking down the IP addresses for that hostname.
After that root server is translating human-readable hostname into IP addresses. There are 13 logical root servers worldwide, denoted by letter A through M controlled by Cogen, the University of Maryland, and the U.S arm lab. The TLD nameserver takes the domain provided in the query and provides the IP of an authoritative name server. The authoritative name server takes the domain name and subdomain, and it returns the correct IP address to the DNS resolver.
9 Steps Of DNS Configuration
Let’ see how to configure a DNS server in 9 easy steps.
Step 1
Install bind packages with their dependencies.BIND stands for Berkley Internet Naming Daemon. BIND is the most common program used for maintaining a name server on Linux.
# Yum install –y bind*
Step 2
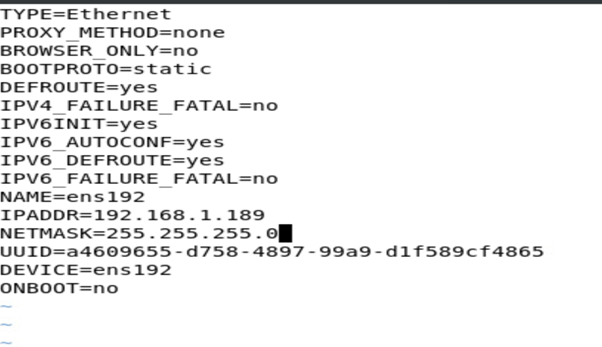
Assign a static IP address in Linux OS. Configure network file.
# Vim /etc/sysconfig/network-scripts/ifcfg-eth0
Step 3
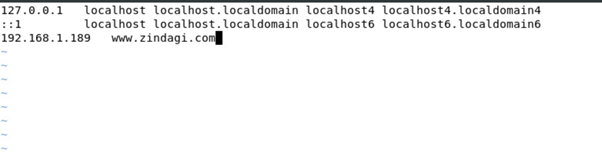
Add a host entry in the host file. Just add your local machine IP address with the domain name of the website which you are hosting on a local server. After the edit, the host file restarts the network and ping the specified IP address to see whether the data is exchanged or not.
# vim /etc/hosts
Step 4
Add server IP to the resolv.conf file.
# Vim /etc/resolv.conf

Step 5
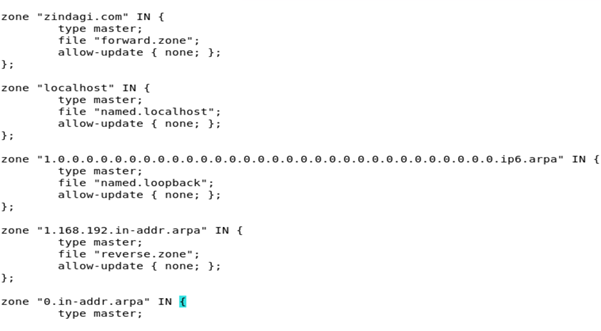
Configure /etc/named.conf file and edit the following lines.
# Vim /etc/named.conf
Step 6
Open /etc/amed.rfc1912.zones file. Next, we need to add zone records for the forward zone file and reverse zone file. In this file, we set up a master forward record and master reverse DNS record.
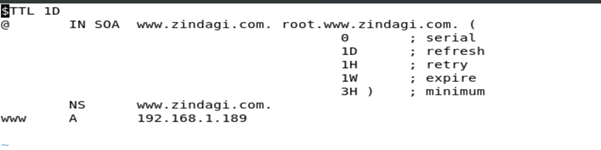
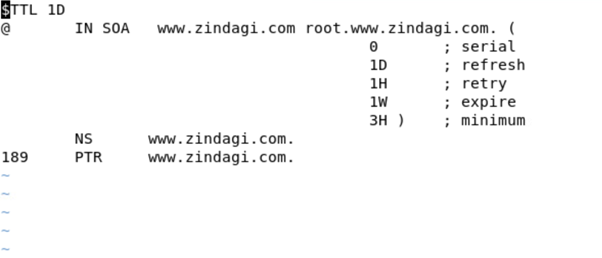
Step 7
Configure forward and reverse zones. Now create the forward zones and reverse zone files and replace them with your hostname Forward Zone is where the hostname (or FQDN) to IP address relations is stored; it returns an IP address using the hostname. Note that normal DNS queries are forward lookup queries. On the other hand, a Reverse Zone returns the FQDN of a host based on its IP address.
Step 8
Change the group ownership for forward zone and reverse zone files.
# chgrp named /var/named/forward. Zone
# chgrp named /var/named/reverse. Zone
Step 9
Restart the DNS service.
# Service named restart
In the next step, you should use the ns lookup utility to query the IP using the hostname and vice versa. You can also use dig to test DNS servers.
Zindagi Technologies is a leading IT Consulting company and has been performing under the best circumstances for more than half a decade. We have delivered solutions and to all the issues and challenges that are presented to us by different organizations. Giving the top class managed IT services, we have gained a good and reputed clientele in the private and public sectors. If you require services related to IoT, Data Centre, Cloud, Managed IT, Security then give us a call or WhatsApp us on +919773973971 or drop us a mail, we’ll be happy to serve you.
Author
Pankaj Bakshi
Associate Consultant
Comments (3)
Leave a Reply to Sean B Cancel reply
You must be logged in to post a comment.

Sean B
August 30, 2022Many typos in this doc, should be reviewed with actual environment to validate sample command lines etc. Otherwise, good basic overview.
What is DDI & why you need it | Zindagi Technologies
September 30, 2022[…] to characterize it. In a nutshell, DHCP allocates IP addresses, IPAM controls IP resources, and DNS provides IP addresses. By combining these fundamental DNS, DHCP, and IP address services into a single platform solution, […]
Aqiqul
February 11, 2023The best and easiest way to setup dns,Thanks!