How to Create Shares on NAS Appliance
In the previous blog, we covered how to deploy a Dell NX3340 cluster over Windows Server Failover Cluster. In this blog, we will continue with the concepts of a NAS appliance and take a deeper look at how we can create different kinds of shares and the procedure for mounting those shares on Windows and Linux operating systems.
There are two kinds of shares that can be created on a NAS server:
- Network File System (NFS)
- Server Message Block (SMB)
Before we proceed ahead let’s take a high-level look at what is NFS and an SMB share and what’s the difference between them.
Network File System (NFS) Share
Network File System protocol uses server and client architecture. NFS protocol was developed by Sun Microsystems, and it was released in 1984. The protocol has evolved over the decades. NFS is mostly preferred for Unix / Linux operating systems. Now having said that, NFS shares can be created on Windows operating system as well, but it requires extra configuration which can make the design more complex.
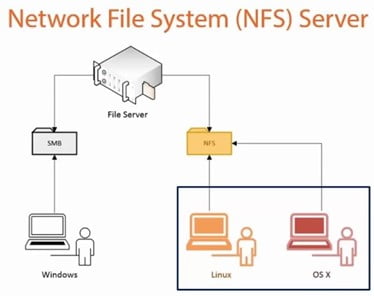
You would need to enable the NFS role through Server Manager or PowerShell and on top of that, you would need to configure the user ID mapping and Group ID mapping for the users who would be accessing the shares through the Windows domain. To avoid this complex configuration of a user ID and Group ID mappings, you can allow anonymous access to the shares, but it introduces a security risk as the users would then have root privileges to the share.
NFS uses the following ports – TCP & UDP 2049, 111
Server Message Block (SMB) Share
Server Message Block protocol also works in a client-server architecture. SMB was first released by IBM in the mid-1990s. Common Internet File System (CIFS) is a type of SMB protocol that was released by Microsoft.
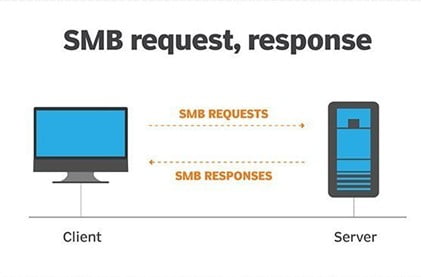
Microsoft Windows is the preferred operating system for SMB shares. SMB requests and SMB responses are exchanged between client and server in an SMB architecture.
CIFS uses the following ports – TCP 139, 455 and UDP 138, 137
Creating Shares on NAS Server
Now that you have a little bit of an idea about NFS and CIFS shares, let’s see how you can deploy these shares. To create a share on the Windows Server, you should first navigate to Windows Server Manager and enable the NFS role on the server. If you’re running a cluster of NAS appliances and you’re running a Windows Server Failover Cluster among them then the role should be enabled on the cluster and not an individual node. To enable the role on the cluster, navigate to the Server Manager and open Failover Cluster Manager, and enable the NFS role from that window.
Once the role is enabled on the cluster, navigate to File and Storage Services, and select shares. On the Shares screen, Click the Task button and select New Share. A New Share Wizard would open and would ask you to select the profile for your share which is SMB or NFS. Select the profile for your share and click Next. On the next screen, select the storage which is accessible by the NFS role. After you’ve selected the storage, enter the name for your share. On the next screen, choose the preferred method for authentication.
It is recommended to have proper Group ID and User ID mappings configured in place and not to allow anonymous access to the shares unless absolutely necessary as anonymous access will provide root user access to the share for all the clients, and this is a potential security risk. After selecting the authentication method, review all the information provided by you and select Finish.
Mounting Shares on Windows Client
To mount shares on a windows client, navigate to file explorer and select This PC from the left pane. After you are at the PC screen in file explorer, select the Computer button from the top of the window and click Map Network Drive. Enter the path for the share and select Finish. The network share should appear as a local drive on your computer.
Mounting Shares on Linux Client
To mount a share on Linux operating system, install the NFS package on your machine by using the following command
Command – sudo apt update
Command – sudo apt install nfs-common
Now you need to create a directory to mount your shares on the Linux client. Use the following command to create a new directory
mkdir /mnt/shared
After creating a new directory, now we need to mount the share on the new directory by running the following command:
mount -t nfs serverIP: /share_file_path /mnt/shared
Use the following command to verify that NFS share is showing up in the drives list on the client machine
df -h
The share that you add in the Linux client goes away after the Linux client is restarted or shut down. To make the NFS Share permanent, you need to configure /etc/fstab script on the client so that it automatically gets mounted. Run the following command to make the share stay permanently.
Command – vi /etc/fstab
Server-IP:/share_file_path /mnt/shared nfs default 0 0
To sum it up these were the steps to configure shares on the server-side and how to make those shares visible on the client-side. If you’re looking for Planning, Designing, Implementation, or PoC professional services for your data center to build a resilient storage solution, reach us at [email protected] or give us a call at +91 9773973971.
Author
Sumit Yadav
Data Center Consulting Engineer