How To Take LVM Backup In Easy Steps
In our previous blog, we show how we configure Logical Volume Group. Now, if we are talking about LVM backups, for many several reasons a volume group may become corrupted after unintended user intervention. there are two useful commands – vgcfgbackup and vgcfgrestore. Using this command, we take a backup of our accidentally delete the volume and we also restore it. These commands allow you to back up the metadata of the volume group. In many cases, the LVM configuration is corrupted. LVM may also be damaged when some disk fails and rebooting OS fails to boot. Therefore, it is important to have an LVM configuration backup.
By default, Metadata backup is stored in /etc/lvm/backup file and the Metadata archive stored in /etc/lvm/archive file. At the top of it file, it will tell you the Time/Date when the file was generated so chances are you will have a copy of the older metadata as it was before the irreversible operations.
Lab Scenario
We have 3 physical disks sdb, sdc, and sdd with the size of 10GB each and we have a vg (volume group) with the name of vgfirts, which has lv (logical volume) with the name of firstlv.
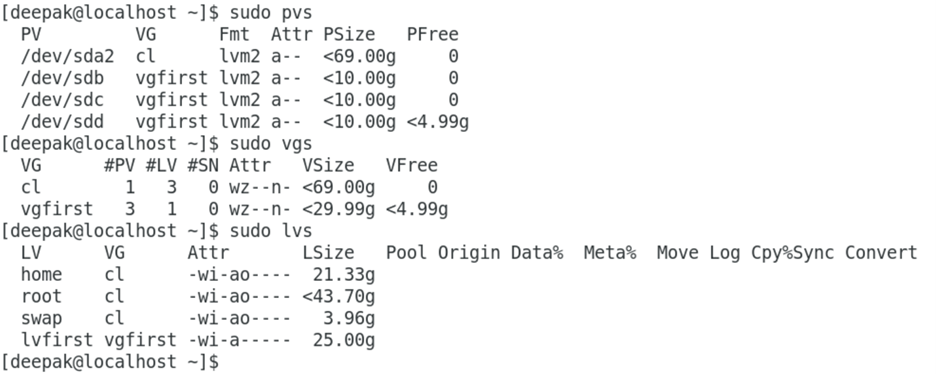
Now, we write a file system on top of that and mount it on the disk25 directory.
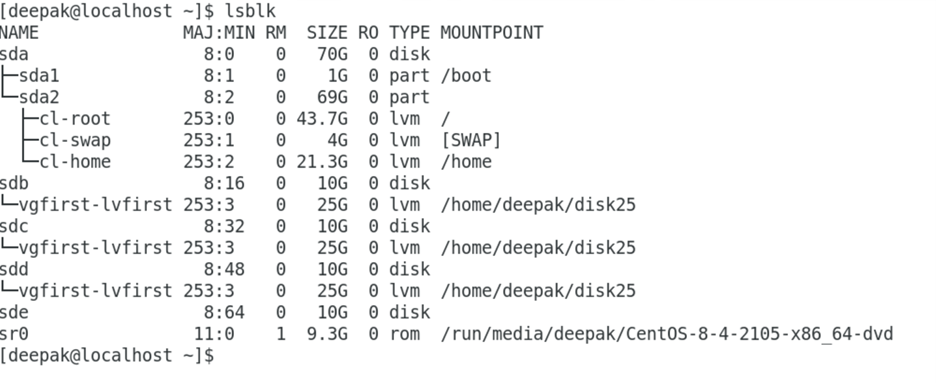
Comes to our main point if in case any user or anyone by mistake deletes our logical volume (firstlv), what do we do?
The solution is simple we take a backup of our logical volume. Here I do this, and you also follow my steps. I’m going to delete my vg (volume group).

We successfully remove our logical volume (lvfirst) from the volume group (vgfirts).
Now, we take a backup of our logical volume using vgcfgbackup command. As we know the lvm backup file stored in /etc/lvm/backup
Vgcfgbackup
The vgcfgbackup command restores the LVM volume group configuration from the archive to all physical volumes in the volume group. If the volume group is activated in shared mode, the restore cannot be performed. Make sure to use the vgcfgbackup command and following command to make a current copy of the existing working configuration -f flag to specify an additional file for the output so you don’t change /etc/lvm/backup either /etc/lvm/archive folder.
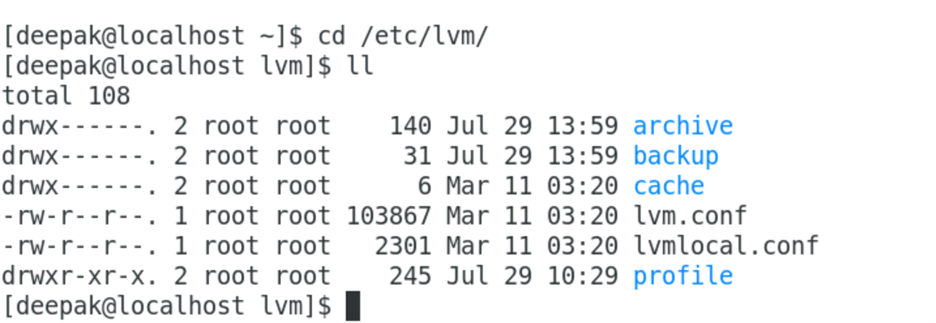
we show that the archive and backup directory are present here. Inside the archive directory, all data are stored.

Run command vgcfgrestore -f vgfirts (volume group name) after running this command we get this output
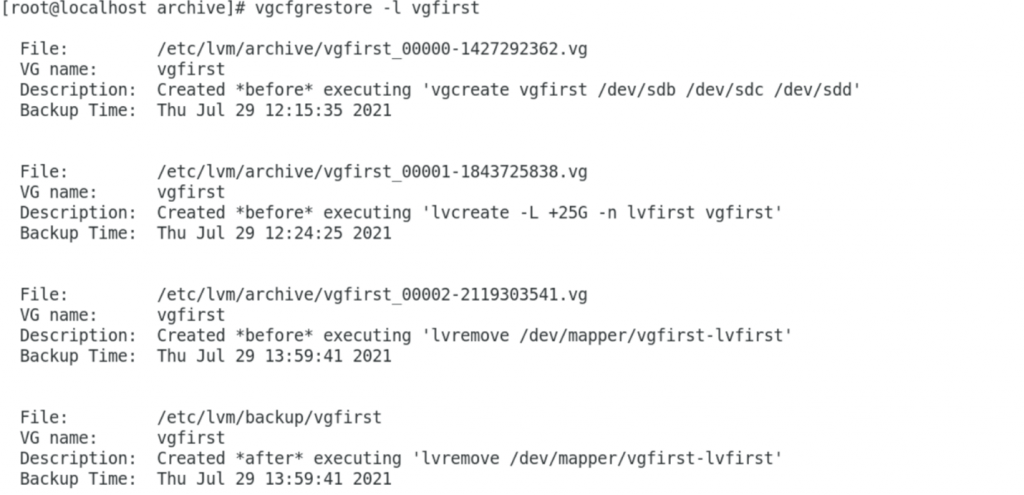
If you read all descriptions inside this command output, you know that when to backup data. In our case, we need to full logical volume backup, so we read the third row.
File: /etc/lvm/archive/vgfirts_00002-2119203541.vg
VG name: vgfirts
Description: Create *before* executing ‘lvremove /dev/mapper/vgfirts-lvfirst’
Backup Time: Thu Jul 29 13:59:41 2021
It means when we execute the lvremove command when we have to backup.
For taking backup – Execute this command

After this command you can check your lv is restored. But if you check this is in Inactive mode. So firstly, we need to Active mode.
Using the lvscane command you can check this. To change Active mode, you need to run command –
lvchange -ay /dev/vgfirts/lvfirst
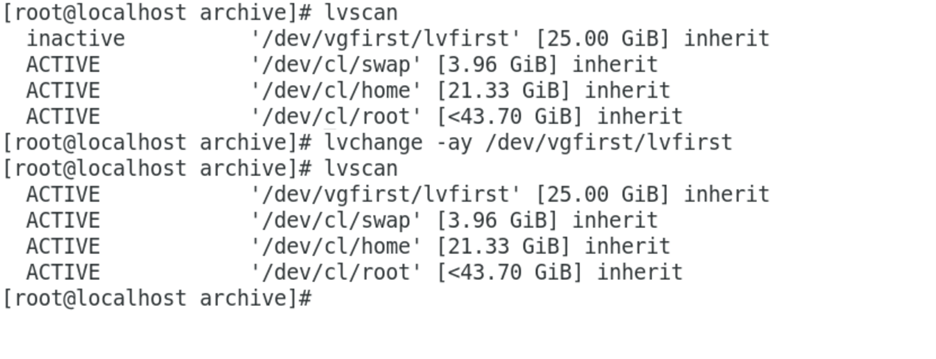
Now, time to mount our logical volume on the directory
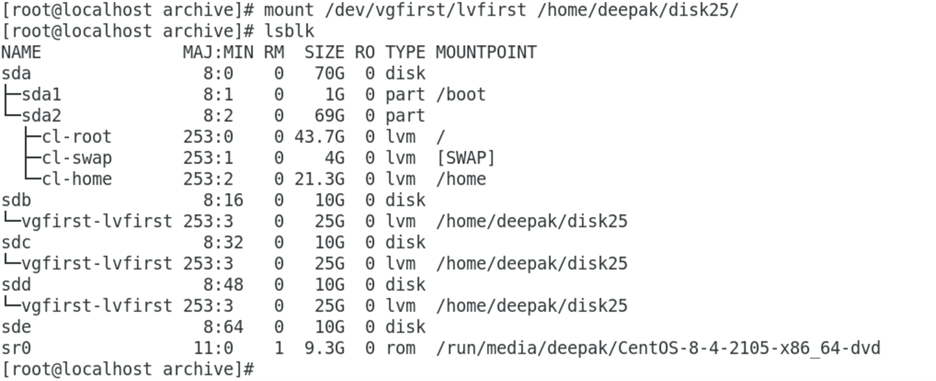
Here we have successfully mounted our deleted logical volume. It means we take a successfully backup of our accidentally delete the logical volume. We have seen that how to take backup. I hope to you all you understand. If in case, you have any queries related to this or another please let me know.
Zindagi Technology has been a helping hand and fulfilling technology business requirement for those who need planning, designing, and deployment of the resources that we provide. We are an IT company that is dynamically growing and providing professional services that will transform the business of our clients. We only strive for the best and get in touch with us, you can give us a call at +91-9773973971.
Author
Deepak Kumar
Linux and Server Administrator
