Useful And Most Important Firewall Commands In Centos
In this blog, we will discuss the fundamentals of Firewall services introduced in CentOS named FirewallD. Firewalld provides a way to configure dynamic firewall rules in Linux that can be applied instantly, without the need for firewall restart and it supports D-BUS and zone concepts which mark configures easy. It comes with an extremely powerful filtering system called Net Filter, which is built right into the kernel module to check every packet that travels across to the system. From Centos-7 onwards firewalld became a default tool to manage the host-based firewall service. The daemon of the firewalld is installed from the firewalld package and it will be available on all the base installations of the OS but not on the minimal installation.
In CentOS 8 or higher version, we can still use classic iptables. In order to use iptables, we need to stop and disable the firewalld service. Using both (firewalld and iptables) together will mess up the system, as they are incompletable with each other.
Prerequisites
OS (Operating System) – CentOS 8 or higher.
Package – firewalld
Account – root user or user account with sudo privileges.
Recommended to run all administrative commands as with sudo privileges instead of root.
Step 1 – “Install and enable Firewall services”
Firstly, we update the latest current version of the packages.
Command – yum update -y

You can see here our current version of packages is up to date. Now we are good to go for the next step. If in case your current version of the packages is not up to date, please do it because it is mandatory. Firewalld will be available on all the base installations of CentOS but not on minimal installation, in that case, we can follow this command to install.
Command – yum install firewalld -y

Start and enable firewalld services –

Now you can see that in our case our firewalld.service is enabled and start also. You can verify it by using systemctl status firewalld.service command. You can also verify using this command firewall-cmd –state.
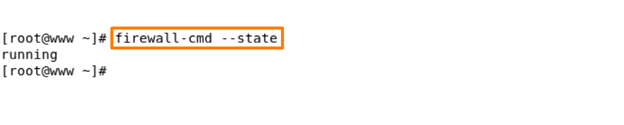
It is running means our firewall services is successfully installed.
Step 2 – “Zones”
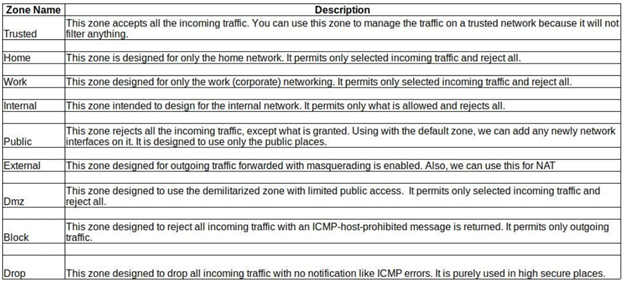
Firewalld introduced serval predefined zones and services for different purposes. One of the main purposes is to handle firewalld management easier. Based on these Zones and services we can block any form of incoming traffic to the system unless it explicitly permits using some special rules into the zone.
Check all the available Zones in firewalld –
Command – firewalld-cmd –get-zones

In our scenario, our firewall is using a public zone. But these are default pre-defined zones sorted based on the trust level –
Find out the default zone –

Here we can be able to see our default zone is public.
Find out if there are any rules listed in the active public zone –
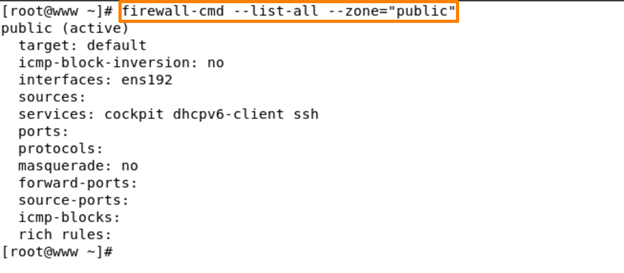
Here we find out in this output shows that the public zone is active and set as default, the network interface “ens192” is associated with the active zone.
Reload firewall services –
This command helps you if in case you can change some firewall settings like if you add any port in the firewall, allow some services like tcp, udp etc. then you need to hit this command to reload the firewall services.
Command – firewall-cmd –reload

Step 3 – “Adding and Removing Services in firewalld”
Similarly, a firewalld has another component called “Services”. These services can be used in the zone file to manage the traffic rules in the firewall settings. From the following list, each pre-defined “Services” are used in the default configuration of the file zone.
How to list all the available services in firewalld?
Command – firewall-cmd – -get-services
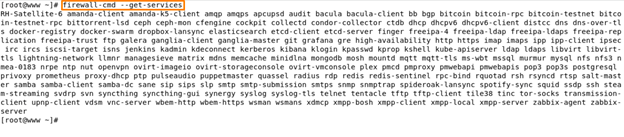
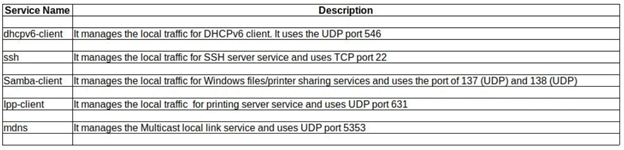
Inside this output, we have all services like ssh, http, https etc. firewalld ships with several services for various purposes. In the above output, you can see the complete list of all the services.
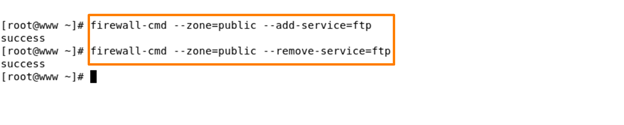
For Example – the following commands will help you add or remove specific services, like did for FTP here in this example –
Command – firewall-cmd – -zone=public – -add-service=ftp
firewall-cmd – -zone=public – -add-service=ftp
Step -4 “Firewalld Runtime and Permanent”
By default, firewalld supports two separate modes, permanent and runtime (immediate). When we start the firewall, it loads all the permanent configuration files into the runtime. Any chance you make either an add or update will be applied to runtime configuration and will not be enabled automatically to the permanent configuration.
Add any services permanently –
Command – firewall-cmd –add-services=ftp –permanent

Using this command, you can add any services to the firewall permanently. After that you need to reload the firewall services using reload command – firewall-cmd reload
Remember – when you use a “—permanent” flag, don’t forget to reload the firewall services.
Migrate runtime setting to Permanent –
Command – firewall-cmd –runtime-to-permanent

If you run this command, your runtime services are saved as permanent.
Step 4 – “Adding and Removing Ports in Firewalld”
To open any port for a public zone, use the following command. The firewalld permits us to handle the network port directly. The main benefit is without even installing a specific service into the system, we can open and close the related port in the firewall.
Open a port for the samba services in the public zone –
Command – firewall-cmd – -zone=public – -add-port=137/udp

we add all ports for samba services successfully. Now we can check all ports are added or not? Using this command –
Command – firewall-cmd – -list-ports

Similarly, to remove added ports, just use the ‘-remove’ option with the firewalld command as shown below
Command – firewall-cmd – -zone=public – -remove-port=137/udp

Using this remove flag we can successfully remove port number 137/udp.
Here, we can see all ports are added successfully.
In this blog, we understood firewall services. Thank you for taking your valuable time to read! I hope this blog will help you to understand the basic usages of the firewall-cmd command for example. Drop us your feedback or comments if you like this blog, kindly share it, and may help others as well. This brings us to the organization that is dedicated to IT consulting and managed IT services. Zindagi Technologies has been providing services for many years which makes us one of the trusted IT consulting companies as we deliver what we promise. If you want services, then give us a call or WhatsApp us at +919773973971. You can also drop us an email.
Author
Deepak Kumar
Consultant – Server & Virtualization
Poornima HM
January 22, 2022It’s blog is very useful for me.
Thank you so much Deepak sir for this Blog. Please keep writing more informative blog on Linux.
Thanks ☺️
Brajesh kushwaha
January 22, 2022very informative blog keep writing more than more.
Brajesh kushwaha
January 22, 2022I always thought how I manage Firewall on CLI terminal, but when I read your blog it’s very helpful to me. And I gained some information about firewall on CLI terminal.
Thanks for sharing knowledge Deepak, keep it up 😊
Brajesh kushwaha
January 22, 2022I always thought how I manage Firewall on CLI terminal, but when I read your blog it’s very helpful to me. And I gained some information about firewall on CLI terminal.
Thanks for sharing knowledge Deepak, keep it up 😊
Dexter Dunman
October 5, 2022I love it when folks come together and share opinions. Great blog, keep it up!