What is the Fabric Discovery Process in ACI (Application Centric Infrastructure)?

All switches that are a component of the ACI fabric are managed and automated provisioned through the APIC. Multiple ACI fabrics may exist within the same data center, and each ACI fabric may have its own APIC cluster and Cisco Nexus 9000 Series switches. Each switch must be registered with the individual APIC cluster that controls the fabric to guarantee that it is solely managed by that APIC cluster.
New switches that are directly related to every switch the APIC currently administers are found. Only the leaf switch that is directly connected to each APIC instance in the cluster is first discovered. The spine switches that are directly connected to the leaf switch are all found by the APIC when the leaf switch has been registered with it. The APIC identifies all the leaf switches attached to each spine switch as they are registered. The APIC can quickly learn the complete network topology thanks to its cascaded discovery.
A switch becomes a component of the APIC-managed fabric inventory after it has been registered with the APIC. The APIC serves as the single point of provisioning, control, and monitoring for switches in the infrastructure using the Application Centric Infrastructure fabric (ACI fabric).
Using the GUI, register the Unregistered Switches
Before starting, the Procedure Verify that the fabric’s switches are all physically connected and booted.
There are some steps to mention below
Step1
Select INVENTORY > FABRIC from the menu bar.
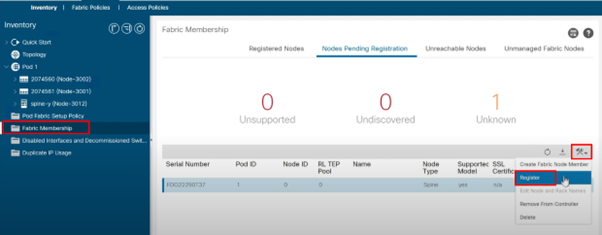
Step2
Click Fabric Membership in the Navigation pane.
One leaf switch with ID 0 is visible in the Fabric Membership table of the Work pane. The device that is linked to Apic1 is the leaf switch.
Step3
Double-clicking the leaf switch row will allow you to configure the ID by doing the following:
a). Add the proper ID to the ID field ( example:-leaf1 is ID 201, and leaf 2 is ID 202).
Note:- The first 100 IDs are for APIC appliance nodes, hence the ID must be a number higher than 100.
b). Enter the switch’s name in the Switch Name field, then click Update.
Step4
Once one or more spine switches appear, keep an eye on the Work window.
Step5
By clicking twice on the spine switch row, configure the ID and take the following steps:
a). Add the proper ID to the ID field (spine1 is ID 101 and spine 2 is ID 102).
b). Enter the switch’s name in the Switch Name field, then click Update.
Note:- It is advised to assign separate numbers to leaf nodes and spine nodes. For instance, count the number of leaves at 200 and the number of spines at 100.
The switch receives an IP address, and it appears underneath the pod in the Navigation pane. Before moving on to the following step, wait until all switches are present in the Node Configurations table.
Step6
Follow these instructions for each switch specified in the Fabric Membership table:
a). Click Update after double-clicking the switch, and entering an ID and a Name.
b). Continue for the following switch on the list.
For more information go to this link cisco.com
In this blog, we learned how to discover a switch into the fabric by ACI.
With engineers having decades of experience in the design, development, and implementation of data centres as well as managed IT services, cybersecurity, and cloud services, Zindagi Technologies is a Delhi-based provider of IT consulting and cybersecurity services. In addition to this, we also provide a wide range of other services that can assist you in identifying flaws in your IT infrastructure. Call us right now if you wish to safeguard your network. Please send us a message or give us a call at +91-9773973971. You can follow our company on LinkedIn to receive the most recent information about our blogs.
Author
Anuj Kumar
Associate Consultant