How To Manage Software Images using DNAC?
In this blog, we will look at the Repository Part of the Cisco Digital Network Architecture Centre (DNAC).
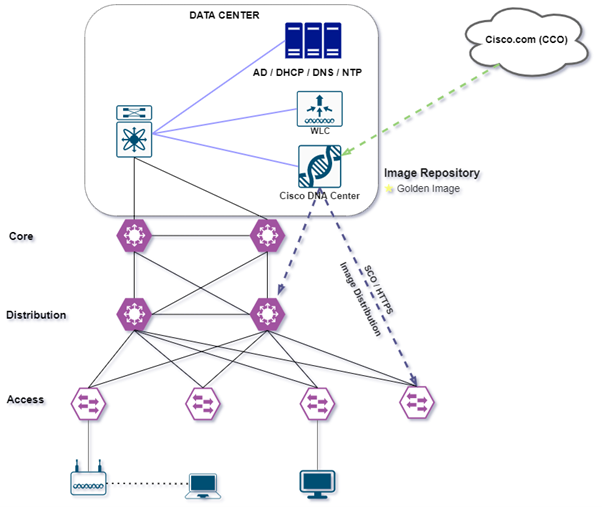
All the software images and software maintenance updates (SMUs) for the devices in your network are stored in Cisco DNA-Center.
The Image Repository has the following features:
- Image Repository—Cisco DNA Center stores all the unique software images according to image type and version. You can view, import, and delete software images.
- Provision—You can push software images to the devices in your network.
DNAC – Integrity Verification of Software Images
The Integrity Verification program keeps an eye on software images saved in Cisco DNA Center for any unusual modifications or invalid data that could indicate your devices have been compromised. The system assesses image integrity throughout the import process by comparing the software and hardware platform checksum value of the image you are importing to the checksum value indicated for the platform in the Known Good Values (KGV) file to guarantee that the two values match.
DNAC – View Image Repository
Cisco DNA Center automatically maintains information about the software images, SMUs, and sub-packages for the devices after you perform Discovery or manually add them.
On form DNAC Home page, choose Design > Image Repository

Depending on the device type, the software graphics are grouped and shown differently. Software images for physical devices are presented by default. To view software images for virtual devices, go to the Virtual tab.
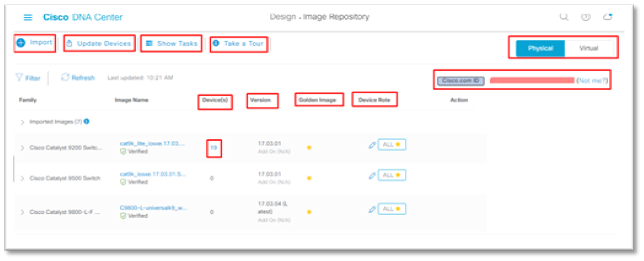
Let’s understand the Image Repository dashboard.
IMPORT: Start here to import images, SMUs, and other add-ons into the image repository from a local file system or a URL
Image Name: The detected and/or imported image, as well as the trustworthiness status, are displayed. To learn more about an image, simply click on its name.
Devices: The count in this field shows how many devices in the system are using this image version. To get a list of devices that use that image, click the count.
Golden Image: Assign the color “gold” to the future standard image. It initiates a background image download from the device. Some images that cannot be downloaded directly from the device show. (*[Golden] indicates the image is already marked golden).
Action: Click the icon to delete the images that were imported into image repository.
Cisco.Com ID: Shows the Cisco.com connected account with DNA Center.
Physical VS Virtual: It shows all type if images that include, cisco as well as non-Cisco also.
Show Task: To see the progress and status of recent tasks involving image import and deletion, go here.
Update Device: Once the images have been imported and identified as golden, go to the provisioning device page, and select Update Devices to update the devices with the golden image.
Import a Software Image
Click on import button We got two option to add images on DNAC.
First option: Using the Chose file icon, we can select an image from our local device and import it.
Second option: We can enter the image URL and connect with cisco.com as the source.
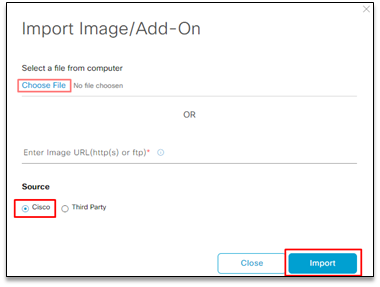
Third Option: If you wish to import an image from a third-party DNA support hat, simply select the third-party option and select the image you want.
Step 1: From DNAC Home page, Choose Design > Image Repository.
Step 2: Click on Import
Step 3: Click choose File. We can select the Third party, Source.
Step 4: Click on Import.
Step 5: Click on Show task to verify image successfully uploaded to DNAC.
Integrity Verification
The Integrity Verification program keeps an eye on software images saved in Cisco DNA Center for any unusual modifications or invalid data that could indicate your devices have been compromised. The system assesses image integrity throughout the import process by comparing the software and hardware platform checksum value of the image you are importing to the checksum value indicated for the platform in the Known Good Values (KGV) file to guarantee that the two values match.
After Importing and making it as golden image, you can directly provision this image to devices. You can do it via Update device Option in image repository or directly Go to Inventory.
If you want to Provision Software Images, you only need to follow these few steps:
Provision — > Devices — > designate the device as checked — > Action — > Software image — > Update image.
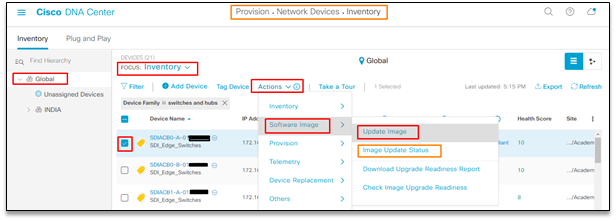
After Clicking on Update Image, you will get two option to deploy. It can be deployed Now or Later
If choosing later to define the time and date when the Update image will be initiated.
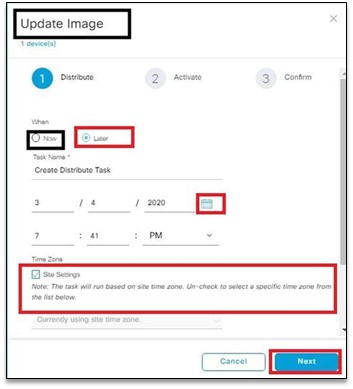
After Choosing Now or Later and defining time and date you can click on Next and Finish.
Important note: Before releasing a software image to a device, Cisco DNA Center performs tests on the network devices, such as the CPU, RAM, PSU, disc space, and other components. The software image procedure is cancelled if any of the checks fail.
List of Device Upgrade Readiness Prechecks
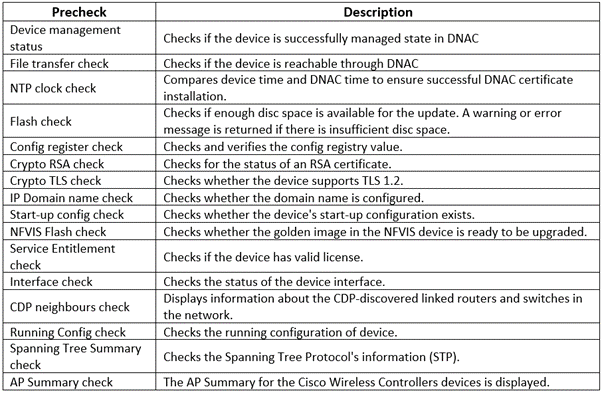
Auto Flash Clean-up
- The flash check examines whether there is enough space on the device to copy the new image during the device upgrade readiness precheck. If there isn’t enough space:
- The flash check fails with a warning message for devices that allow auto flash clean-up. To create enough space on these devices, the auto clean-up operation is attempted during the image distribution phase. Cisco DNA Center finds unused.bin,.pkg, and.conf files and deletes them iteratively until adequate free space is created on the device as part of the auto flash clean-up. After the flash clean-up, image distribution is tried. These deleted files can be viewed in System > Audit Logs.
Important note: Except Nexus switches and Wireless controllers, all SD-ASD-Access-supported cess support auto flash clean-up. For the devices that do not support auto flash clean-up, you can elete files manually.
Finally Go toDevices — > designate the device as checked — > Action — > Software image — > Update image Status.
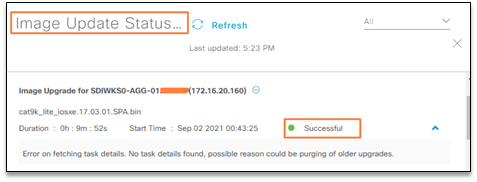
Update image status will show you the status, upgradation is going on, successful done, or found any error.
If you wish to know more about Cisco DNA Center, you can refer the blog Cisco DNA Center Workflow.
We here at Zindagi Technologies, have a team of certified Subject Matter Experts who specializes in SD-Access solutions. If you are looking for Planning / Designing / Implementation / PoC services for SD-Access, reach us out at Zindagi Or call us at +91-9773973971.
Author
Ravi Kumar Singh
Network Enterprise Consultant
