A Step by Step Deployment Guide of Cisco 9800 CL.
The new Cisco 9800-CL wireless controller is simple to set up, and with the built-in workflows, a new wireless network can be up and running in a matter of minutes. In this post, I’ll show you how to install VMware ESXi’s virtual wireless LAN controller and set up a basic WLAN. We’ll also look at several potential snags and notable changes between the new WLC and the AireOS WLC in terms of configuration.
Cisco refers to the 9800-CL as a cloud platform, but what it really means is that you can use it in AWS or locally in ESXi, KVM, and other virtualization environments. It’s vital to understand that the vWLC and standard hardware appliances have feature equivalence (9800 L, 9800-40, 9800-80, and Catalyst 9300 switch platforms). To me, this means that I now have a lot of other options for deploying a wireless controller.
DEPLOYING the Cisco 9800-CL in VMware ESXi
In ESXi 6.0 Update 2, This is the version I’m using in my lab, and I can confirm that it works perfectly. However, I haven’t tried deploying in 6.5 yet. Although the OVA downloaded from Cisco is preferred, there is also an ISO available.
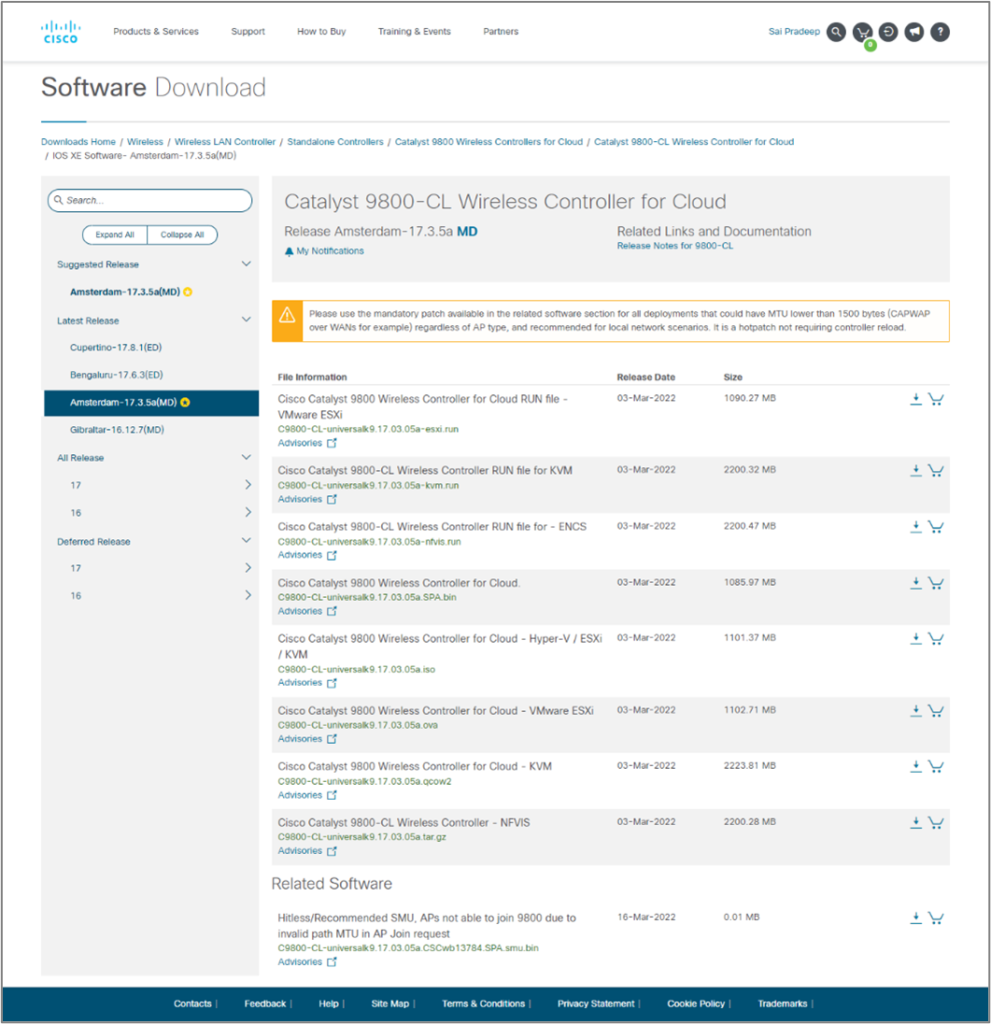
To download Cisco vWLC below is the procedure.
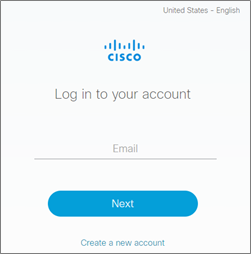
Step one: – https://software.cisco.com/
Step Two: – Login using CCO Id
Step three: – Follow the given below path
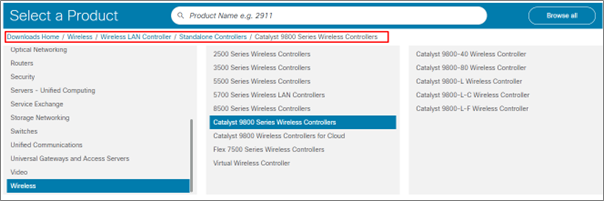
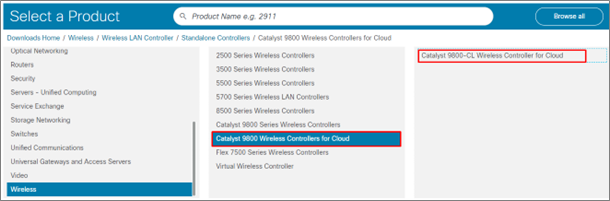
Step Four: – Select Catalyst 9800 Wireless Controllers for Cloud and Click on Catalyst 9800-CL Wireless Controller for Cloud.
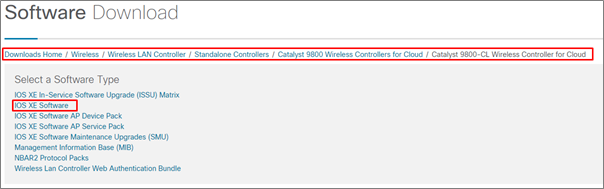
Step Five: – Choose the IOS XE Software for vWLC download if you need to download other files you can simply download them by clicking on them.
Step Six: – Click on Download on the required Image.
Now Let’s begin the installation procedure on ESXi Server.
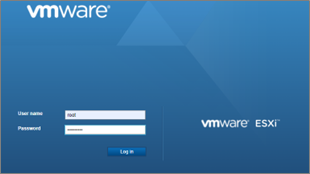
Step 1: – Login to the ESXI server
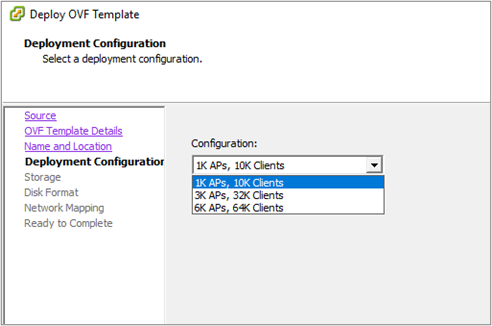
Step 2: – Deploy the 9800-CL OVF from the template using the vSphere client.

Step 3: –For my LAB network, I have chosen the smallest configuration.
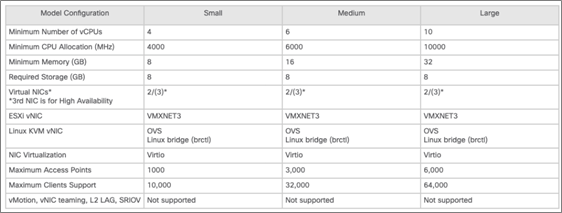
Note: Resource requirement on ESXi Server for the deployment of vWLC.
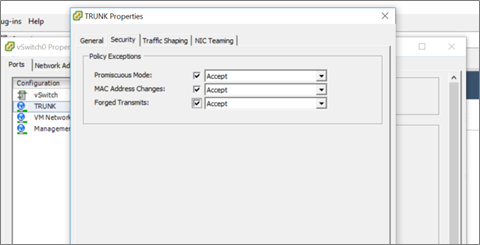
Step 4: – Make sure your networking is configured correctly before turning on the VM. I started with a flat network in my lab, but make sure the new VM’s vSwitch interface is a trunk and the security settings are set to Accept Promiscuous mode, MAC address changes, and forged transmits.
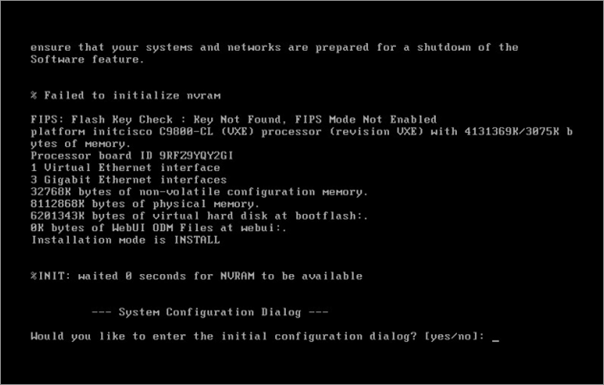
Open the terminal and turn on the virtual machine. You have a few options here:
- Allow the VM to get an IP address from DHCP, then log in to the GUI and select the Day 0 configuration.
- use the console to proceed through the first configuration wizard on the command line
- skip the initial setup and start over with the device settings from scratch.
I’ve tried all three techniques, and because this is such a simple platform to set up, I’ve found that skipping the first configuration wizard and starting from scratch adds very little complexity and time if you already know how to use the IOS-XE command line. This way allows you to customize the majority of the vWLC after becoming comfortable with it.
Step 5: –When prompted, type no to skip the initial configuration dialogue and then yes to finish the installation. After that, you’ll be sent to the familiar IOS-XE command line interface.
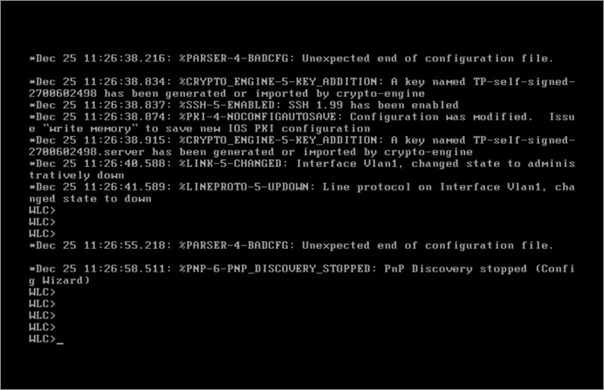
Now do the initial configuration (Day 0 Configuration) just like we do on router switches. Such as SSH, line vty, Create username, hostname, etc…
- Set up GigabitEthernet 1 as a trunk interface.
- For device management, create a management VLAN and an associated SVI.
- Set up a wireless management VLAN and SVI (for joining APs). As with our AireOS implementations, this IP address can be added to DNS connected to CISCO-CAPWAP-CONTROLLER.
Note:
In my network I have only one VLAN 1, I simply created the VLAN 1 SVI.
If you need an OOB Management port, SSO, etc… so you can assign an IP address to GigabitEthernet1.
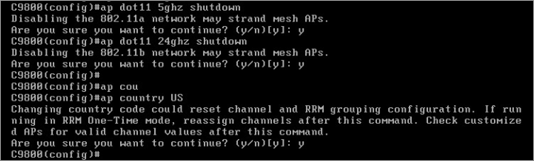
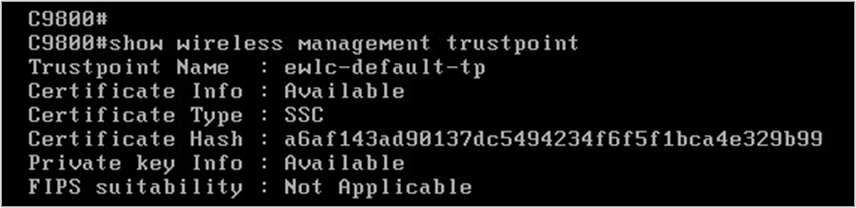
Step 6: – Next, assign a country code, build a WLC trustpoint, and configure the WLC to utilize the relevant wireless management interface explicitly. These tasks must be completed before APs can join.
- To Configure a Country Code: –
- Identify the wireless management interface which you would like to use.

- Create the trust point and certificate now. The command will not work unless the password is 8 characters long. A warning notice will appear if it is not long enough.

- You’ll see some output breeze across the screen when the certificate is created if you use a sufficiently long password. When it’s finished, use the following command to double-check:
Now we can login to GUI.
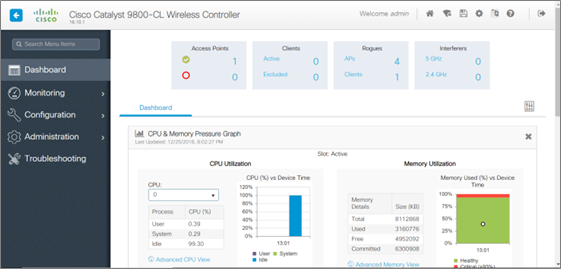
You can now access the graphical user interface. The platform bypasses the Day 0 wizard and takes you straight to the Dashboard because we had configured these last few items.

The dashboard is simple and easy to use, and I enjoy that I can drill down into different components like clients and access points all from one place. I prefer this interface over AireOS after getting acclimated to where everything is.
The AireOS workflow differs from that of the Cisco 9800. It adopts a modular approach, with isolated policies and tags connected in various combinations to produce the desired WLAN behavior.
You can use the controller’s built-in procedures to quickly set up a new wireless network, or you can build the components and connect them yourself.
Navigate to Configuration -> Wireless Setup -> Advanced Sophisticated to access the advanced built-in workflow generator. To begin the guided workflow, select “Start Now” at the bottom of this screen. An “Essential” setup process is also available, which collects only the most basic information and produces the policies for you behind the scenes.
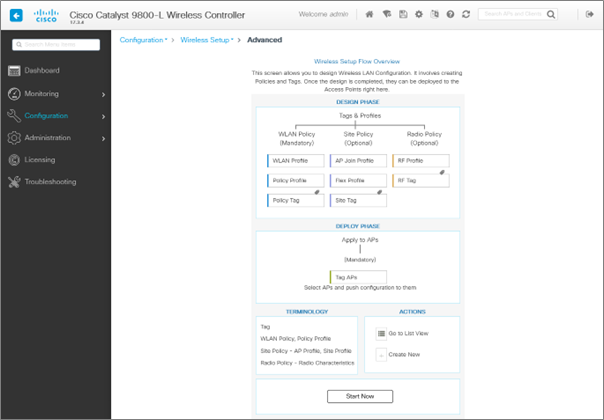
For most ordinary wireless deployments, there are numerous components that must be configured and others that you don’t need to touch. You’ll need an AP Join Policy, a WLAN, a Policy Profile, and a Policy Tag whether you create custom ones or utilize the built-in ones.
Controller Configuration: –
The First 16 WLANs are reserved so WLC will offer start from 17 WLAN.
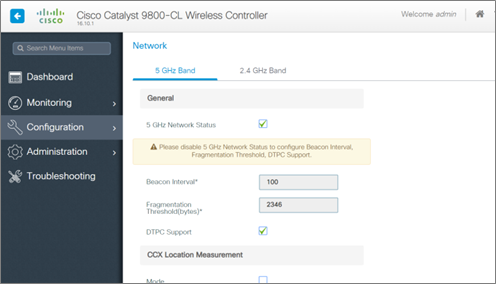
- Go to Configuration -> Radio Configurations -> Network to make sure your radios are re-enabled. Check the box next to 5GHz Network Status, then the same for 2.4GHz Network Status.
- After that, go to Configuration -> Tags and Profiles -> Policy and choose default-policy-profile. Start with the General tab and ensure that the policy is enabled by moving the “status” slider to the right/green.
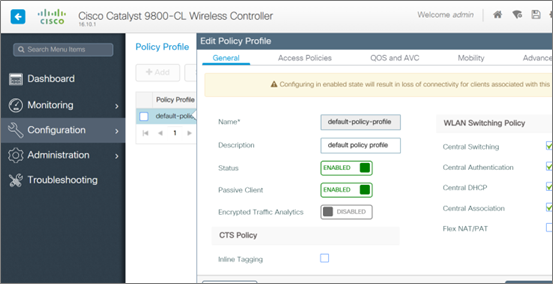
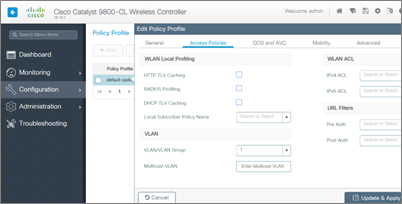
- Enter the relevant VLAN for your test wireless clients under the Access Policies tab — in this case, VLAN 1. Clients will be unable to connect if this setting remains unchanged, and you will notice a “VLAN Failure message” in the log output.
You’d have several SSIDs and VLANs in most instances, so you’d construct a custom Policy Profile for each WLAN and assign the relevant VLAN under the Access Policies tab.
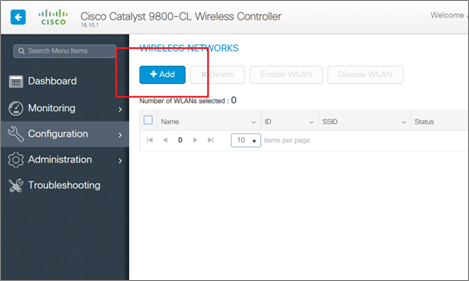
- Go to Configuration -> Tags, and Profiles -> WLANs after that. You’ll create the test WLAN here. Although the built-in process includes a different order of operations, I’ve discovered that my simple workflow completes the task in the fewest steps. Click on add.
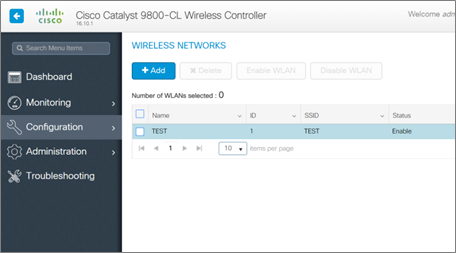
- Fill up the required information and make sure the WLAN is turned on. Then, under the Security tab, select the wireless network security you want to use. I’m using None as the Layer 2 Security Mode for the time being. The options are pretty similar to the AireOS WLAN options, as you can see.
- Select default-policy-tag from Configuration -> Tags, and Profiles -> Tags now that we have a working WLAN, or You can create your own policy tag as per requirement.
We don’t need to adjust anything because we’re not using any special policies. If we were using custom policies, this would be one of the key places where we’d use a Policy Tag to connect several of the components.
- Your access point should have downloaded its new firmware and joined the WLC if it was connected to the network on the correct VLAN. Access Points can be found on the dashboard.
The way APs find and join controllers hasn’t changed, according to what I’ve read. I could be wrong, but I’ve yet to come across any material to the opposite. If your WLC and APs are both on the same VLAN, the APs will use a simple broadcast to locate the WLC. Option 43 and primed APs are also viable options.
Our wireless devices should be able to see the test WLAN using the “TEST” SSID immediately.
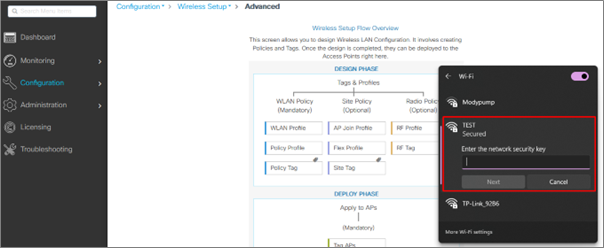
Connect your device to the network.
If you are looking for consulting, advisory, and professional IT services to create a wireless environment for your organization then Zindagi Technologies can help.
Zindagi Technologies Pvt. Ltd. is an IT consultancy and professional services organization. We have expertise in planning, designing, and deployment of Network and Security technologies, large-scale data centers, and Private/Public/Hybrid cloud solutions. For more details, we are available for you, give us a call at +91-9773973971or reach us at Zindagi Technologies.
Author
Ravi Kumar Singh
Consultant – Network Security
Rahul
May 22, 2022Bhot hard bhot hard, useful blog