CISCO DNA WORKFLOW – POLICY
In this part 2 of this blog series, we will cover 2nd pillar of the Cisco DNA Centre workflow that is “POLICY”. Have you read the CISCO DNA CENTER WORKFLOW, the first blog of this series?
Preface
For security reasons, we use Cisco Identity Services Engine (ISE). In SD-Access environment.

This integrates with Cisco DNA Center and we can use DNAC to create a virtual network, access control policy, traffic copy policy, and applications policies.
POLICY
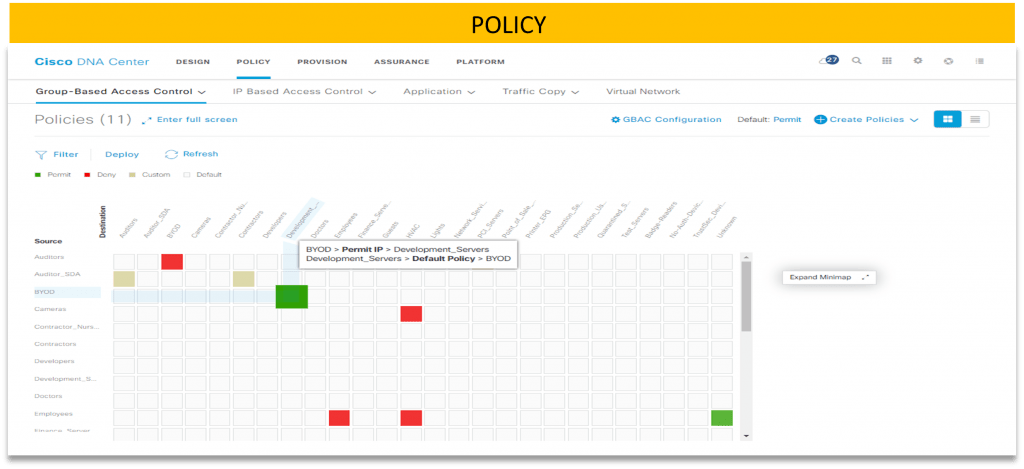
A network should not only provide connectivity among devices but should also ensure that the user devices and resources are segmented properly, as per the requirement of campus/enterprise. In this section, we’ll discuss how DNAC makes easy macro and micro-segmentation.
The Policy consist of 2 steps procedure:
Procedure 1: Macro segmentation using virtual networks
Procedure 2: Micro-segmentation using scalable groups.
MACRO SEGMENTATION USING VIRTUAL NETWORKS
Macro segmentations happen here with the help of virtual network (VNs) which is equal to VRF (virtual routing and forwarding), if we take an example of a real scenario e.g. In the enterprise/campus network there are many types of users like students, faculty who need to communicate with each other, then those users are placed in the same VN. Let’s assume that VN is named CAMPUS_VN. There are other visitors also who consider a guest in the campus network, generally, we do not want to give them our resources access so we can place them in a different VN. Let’s say GUEST_VM.
So, what VN does, just like VRF by default it allows communication within VN but we want that allow different VN to communicate together, we can also do that with help of route leaking (using fusion router).
- DEFAUL_VN is default configured with DNAC. We cannot edit it but if we require then we can use it.
- INFRA_VN this default configured VN is GRT (Global routing table) which only use for, or we can say reserve for APs.
- The maximum number of VN creating depends on device support. (Edge devices have VN limitation)
- Virtual networks are isolated routing and switching environments, we can use VN to make a single physical into multiple logical networks.
- Only the assigned user group can enter the virtual network (VN).
- A virtual network can be present on all devices of the network domain either that site spread over single or multiple locations.
- By default, all users and endpoints are a part of a single virtual network, but when we integrate cisco ISE with DNAC then DEFAULT_VN is populated with user groups and endpoints from the identity service engine.
- In Cisco DNA Center virtual networks are common for the wireless, wired, and WAN networks.
Create A Virtual Network
You can create a virtual network to segregate your physical network into a virtual network. Below are 6 Steps to create VN.
Step 1: From Cisco DNA Center home page, go to policy section >> Virtual network >>
Step 2: Now click on the (+) icon to create a Virtual network
Step 3: Fill in virtual network name for example (XYZ_CAMPUS)
Step 4: If you are creating GUEST_VN only then use that check box [Guest virtual network] because creating guest VN will add some specific config to a device that allows limited access. And we cannot add more than one group in the check box enabled guest VN.
Step 5: Drag and drop the groups from the available scalable groups towards the newly created VN area and that scalable groups are part of the new VN which you have created.
Step 6: Click on SAVE.
Note: you could create multiple Guest VN if you required, by following the same steps again and again.
MICRO-SEGMENTATION USING SCALABLE GROUPS
SGT gives us a second level of segmentation and ensures role-based access control between two groups within VN. With SGT we can create permits or deny the traffic of clients within a VN. Group-based access policies allow us to monitor and manage the access group policy. There are a lot of benefits of SGTs, some of them are given below:
- Basically, SGTs are used for micro-level segmentation to control the network traffic to permit or deny.
- Granulated access control
- Scalable groups apply to all virtual networks, which end up simplifying policy management.
- Easy to understand overall policy structure.
Policy Creation High-Level Understanding.
– Define categories of your organization.
– For the identified categories create a scalable group.
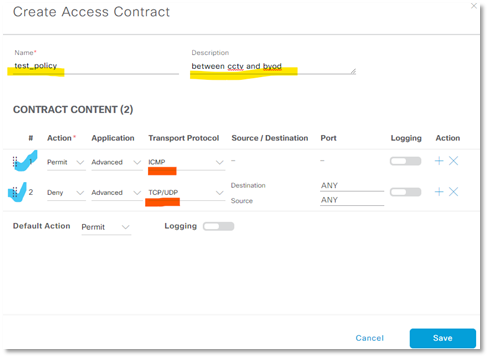
– Create access control for the type of network traffic for which you are willing to control, on DNAC you’ll find some pre-defined access control “permit or deny all traffic” or you can create your own. Refer to the image.

– Now it depends on you which category of users/network users required specific network resources.
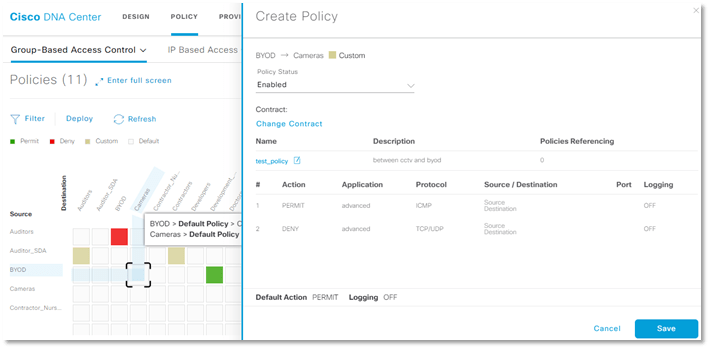
– Finally create an access policy, associate a source group, a destination group & an access contract to define how traffic can follow from source to destination. Refer to the image.

In this part, we have completely covered POLICY and in the coming parts, we will cover PROVISION & ASSURANCE, the remaining 2 steps.
Zindagi Technologies has a team of certified Subject Matter Experts who specializes in SD-Access solutions. If you’re looking for Planning / Designing / Implementation / PoC services for SD-Access, reach us out at Zindagi Technologies Pvt. Ltd. Or call us at +919773973971.
Author
Ravi Kumar Singh
Network Consulting Engineer
