How Can We Configure StackWise Virtual
In the continuation of blogs on the topic StackWise Virtual, we bring the last blog of the series. We hope from the last two blogs Stackwise Virtual Technology and StackWise Virtual – Prerequisites and Restrictions, you have got an understanding of the StackWise Virtual benefits, architecture, components, prerequisites, and restrictions. Now when you have met all the prerequisites and considered the restrictions and are prepared to deploy StackWise Virtual in your environment, so moving further, in this blog we will explain to you the configuration steps to configure StackWise Virtual on Cisco Catalyst 9000 Series switches.
Enable StackWise Virtual
Step 1: enable
To enable the privileged EXEC mode. If Enable Password is set, enter the password and press enter.
Example:
Switch>enable
Step 2: switch <switch-number> renumber <new switch-number>
This is an optional step. If you want to reassign the switch number, run this command.
Where switch-number is the existing switch number and new switch-number is the number which you want to assign to that switch. The range is 1-2.
The Default Switch number is 1.
Example:
Switch#switch 1 renumber 2
Step 3: switch <switch number> priority <priority number>
This is again an optional step. If you want to assign the priority number, run this command.
Where the priority number is the priority of switch which ranges from 1-15. The default priority is 1.
Example:
Switch#switch 1 priority 5
Step 4: configure terminal
To enter in the global configuration mode.
Example:
Switch#configure terminal
Step 5: StackWise-virtual
To enable StackWise Virtual to run this command. This command will enable the StackWise virtual and enters it in the StackWise-virtual sub-command mode.
Example:
Switch(config)#stackwise-virtual
Step 6: domain <number>
Again, this is an optional step. It specifies the StackWise Virtual domain ID.
Where the number ranges from 1-255.
Default domain id is 1.
Example:
Switch(config-stackwise-virtual)#domain 2
Step 7: end
To return to the privilege mode.
Example:
Switch(config-stackwise-virtual)#end
Step 8: show stackwise-virtual
To check the stackwise virtual status.
Example:
Switch#show stackwise-virtual
Step 9: write memory
To save the running configuration into the startup configuration.
Example:
Switch#write memory
Step 10: reload
Reload the switch to let the changes take effect and form the stack.
Example:
Switch#relaod
Cisco StackWise Virtual Link Configuration
As we are aware StackWise Virtual Link plays a vital role in running StackWise Virtual in our IT environment. It enables the exchange of some special control and signaling information between both the switches in the domain in a proper and timely manner which helps the two physical switches to work as a single logical switch.
Step 1: enable
To enable the privileged EXEC mode. If Enable Password is set, enter the password and press enter.
Example:
Switch>enable
Step 2: configure terminal
To enter in the global configuration mode.
Example:
Switch#configure terminal
Now select the interfaces to which you want to make StackWise Virtual Link.
Step 3: interface { TenGigabitEthernet | FortyGigabitEthernet | TwentyFiveGigE } <interface>
To enter the interface sub-configuration mode.
Example:
Switch(config)#interface TenGigabitEthernet1/2/0/4
Step 4: stackwise-virtual link <link value>
To make the interface an SVL.
Example:
Switch(config-if)#stackwise-virtual link 1
Step 5: end
To return to the privilege mode.
Example:
Switch(config-if)#end
Step 6: write memory
To save the running configuration into the startup configuration.
Example:
Switch#write memory
Step 7: reload
Reload the switch to let the changes take effect.
Example:
Switch#relaod
Dual Active Detection Link Configuration
To avoid Dual Active Scenario in the StackWise Virtual environment we use Dual Active Detection Link.
There are two methods to configure Dual Active Detection:
- Dual-Active-Detection Link with Fast Hello
- Dual-Active Detection with enhanced PAgP
Dual Active Detection Link with Fast Hello
In this method, we need to have a direct ethernet connection between the StackWise Virtual Switch Pair. Up to four links can be dedicated for this purpose.
Step 1: enable
To enable the privileged EXEC mode. If Enable Password is set, enter the password and press enter.
Example:
Switch>enable
Step 2: configure terminal
To enter in the global configuration mode.
Example:
Switch#configure terminal
Now select the interfaces to which you want to make StackWise Virtual Dual Active Detection Link.
Step 3: interface { TenGigabitEthernet | FortyGigabitEthernet | TwentyFiveGigE } <interface>
To enter the interface sub-configuration mode.
Example:
Switch(config)#interface TenGigabitEthernet1/2/0/5
Step 4: stackwise-virtual dual-active-detection
To make the interface a DAD link.
Example:
Switch(config-if)#stackwise-virtual dual-active-detection
Note: This command will continue to function but will not be visible after the configuration.
Step 5: end
To return to the privilege mode.
Example:
Switch(config-if)#end
Step 6: write memory
To save the running configuration into the start-up configuration.
Note: Dual Active detection configuration is saved only in the running configuration, not the start-up configuration.
Example:
Switch#write memory
Step 7: reload
Reload the switch to let the changes take effect.
Example:
Switch#reload
Dual Active Detection Link with Enhanced PAgP
To configure Dual Active Detection with ePAgP, we will additionally require a downstream switch with which a MEC is being formed. We will utilize that MEC to make our DAD link work.
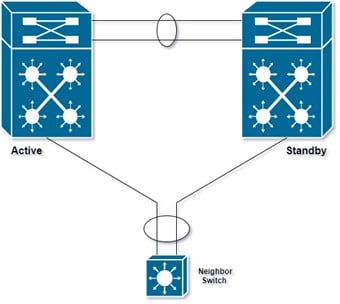
ePAgP Message Path:
Active Switch à SVL à Standby à Neighbour Switch à Active Switch.
Active Switch à Trusted Local MEC Member (PC member that we configured as a trust for DAD) à Neighbour Switch à Standby à SVL à Active Switch.
Step 1: enable
To enable the privileged EXEC mode. If Enable Password is set, enter the password and press enter.
Example:
Switch>enable
Step 2: configure terminal
To enter in the global configuration mode.
Example:
Switch#configure terminal
Now select the interfaces which are connected to the neighbor switch, with which you want to make a port-channel and use it for DAD.
Step 3: interface { TenGigabitEthernet | FortyGigabitEthernet | TwentyFiveGigE } <interface>
To enter the interface sub-configuration mode.
Example: Switch(config)#interface TenGigabitEthernet1/2/0/3
Step 4: channel-group <group_ID> mode desirable
To enable PAgP with a channel group id. Channel group id will reflect as a port-channel number.
Group ID ranges from 1-128 for 10G interfaces.
Example:
Switch(config-if)#channel-group 1 mode desirable
Step 5: exit
To exit to the interface configuration mode.
Example:
Switch(config-if)#exit
Step 6: interface port-channel <channel-group-id>
Select the port channel created above.
Example:
Device(config)#interface port-channel 1
Step 7: shutdown
To shut down the port-channel interface.
Example:
Switch(config-if)#shutdown
Step 8: exit
To exit to the interface configuration mode.
Example:
Switch(config-if)#exit
Step 9: stackwise-virtual
To enter in the stackwise-virtual sub-command mode.
Example:
Switch(config)#stackwise-virtual
Step 10: dual-active detection pagp
To enable DAD with PAgP. However, this is enabled by default.
Step 11: dual-active detection pagp trust channel-group <channel-group id>
To enable the DAT trust mode on the selected channel group.
Example:
Switch(config-stackwise-virtual)#dual-active detection pagp trust channel-group 1
Step 12: exit
To exit to the StackWise virtual sub configuration mode.
Example:
Switch(config-stackwise-virtual)#exit
Step 13: interface port-channel <channel-group-id>
Select the port channel created above.
Example:
Device(config)#interface port-channel 1
Step 14: shutdown
To enable the port-channel interface.
Example:
Switch(config-if)# no shutdown
Step 15: end
To exit to the interface configuration mode.
Example:
Switch(config-if)#end
Step 16: write memory
To save the running configuration into the startup configuration.
Example:
Switch#write memory
Step 17: reload
Reload the switch to let the changes take effect.
Example:
Switch#reload
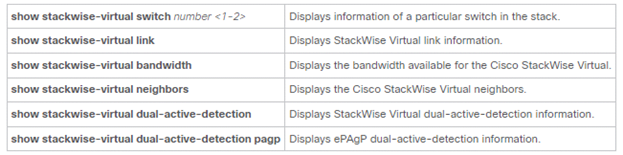
Cisco StackWise Virtual Configuration Verification
Run the following Show commands in order to verify StackWise Virtual Configuration
So, now we have completed the configuration steps to be followed to deploy StackWise Virtual in your environment and this will help you during the implementation.
StackWise Virtual is one of the multiple technologies which makes your IT environment scalable, flexible, highly available. So, choosing the best technologies and features for your environment to make it scalable, flexible, highly available, reliable, and secure and implementing it with ease and efficient manner, requires experts and we Zindagi Technologies have experts for you who can help you in planning, designing and implementation of such Campus Network, Data Centers and many more.
Author
Ankesh Singh
Network Consultant Engineer