How to Easily Integrate WSA With an AD Server?
Hi, today we are going to resolve all your doubts about WSA (Web Security Appliance) AD integration. I assume that you already know about the WSA (Web Security Appliance) and its policies.
AD integration uses for user authentication in WSA. We are sorry to say that, today, we are not covering the authentication part in this blog, but we will publish the blog on WSA authentication later.
To use user authentication in WSA or need to create policies as per groups/users, you need to a realm. Adding a realm is basically an AD integration.
In this blog, we are giving you all the tips on how to integrate an AD server very facilely.
AD Integration – The Only and Major Requirement for User authentication
To add a realm into WSA, you need few details handy about your AD server.
- Primary AD Server IP detail
- Secondary AD Server IP detail
- Domain name
- User (Admin/Enterprise Group) with credential to join the AD
Now, it looks very easy but when I tried to integrate the AD server then I faced some issues, which I will share with you so, you can easily overcome that.
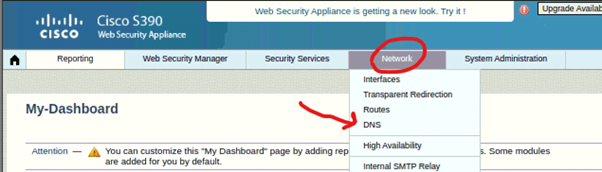
- WSA uses its hostname to integrate with the AD, so, you need to create a DNS entry to your DNS Server and configure that DNS server into your WSA.
- To configure the DNS server in WSA –
- Go to Network Tab > DNS
- Add your primary DNS server with priority ‘0’
- Add the domain name to properly configure the DNS settings.
- To configure the DNS server in WSA –
- For AD integration, WSA supports max. 15 characters hostname so, if your WSA hostname is greater than 15 then you must change that too.
If you have all the above-mentioned AD details, configured DNS and hostname correctly, and created DNS entry as well, so now, we are ready to integrate the AD server. Let’s proceed further.
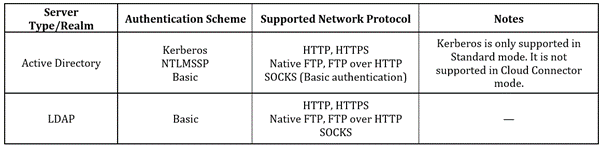
There are 2 types of Active Directory type in WSA. Please choose Active Directory.
Steps To Add A Realm
- Go to Network tab > Click on ‘Authentication’ under ‘Identification Services’.
- Click on Add Realm
- Give any name > Select Active Directory server type > Set source interface > Give Primary and Secondary AD server IP > Give Domain Name > click on Join Domain > Enter your user details to join the AD server.
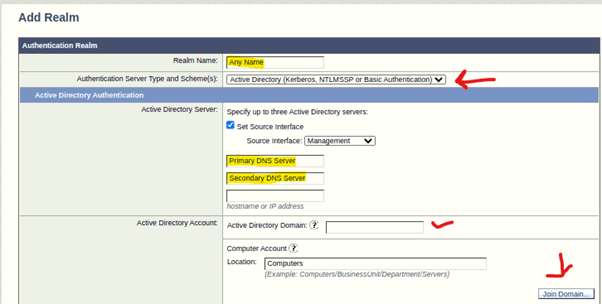
After Successfully Joined the AD server, you can check the details in Network Tab > Authentication.
When a user tries to connect with the Internet then it asks for authentication or the Browser asks for the user credentials. WSA checks those user credentials in the AD server and if it matches then it allows the user to connect with the internet.
As I already said, we will see the WSA authentication part in our coming blog. Cisco WSA authentication blog will link in this blog so, you will check it out easily.
This is the best and easiest method to integrate an AD server into the WSA. I shared my challenges and their resolutions as well. Hopefully, you learned the exact way and resolved your queries with the help of this blog.
We at Zindagi Technologies implements security, Network, Server devices, and much more, plans the architecture of the network, and provide full KT with all the documents. If you need any assistance, then you can directly contact us or call us at +91-9773973971.
Author
Jagjeet Singh
Senior Network Security Consultant