How should you Install DCNM by OVA File on ESXi?
Prerequisites for DCNM Installation
- VMware ESXi host imported into vCenter.
- Three port groups must be present on the ESXi host- DCNM Management, Enhanced Fabric Management Network, and In-band interface.
- Make sure no antivirus is running on the host where the VMware vcenter web client is launched for the DCNM OVA installation. Otherwise, the DCNM installation might fail.
- The DCNM OVA (Open Virtual Appliance) is compatible to be deployed in the ESXi host as well. For deploying in the ESXi host, VMware vSphere Client application is necessary.
DCNM installation we divided into two-part,
First
Where can we download the ova file?
Step1
Go to this site:https://software.cisco.com/download/home/281722751/type/282088134/release/11.5(1)
Step 2
Put the information into the search box > Cisco Data Center Network Manager.
Then click the Search icon. And this screen will be Popup, select Latest Release. Cisco recommends that you deploy Cisco DCNM Release 11.5(1) only because any other Release found some Bug.
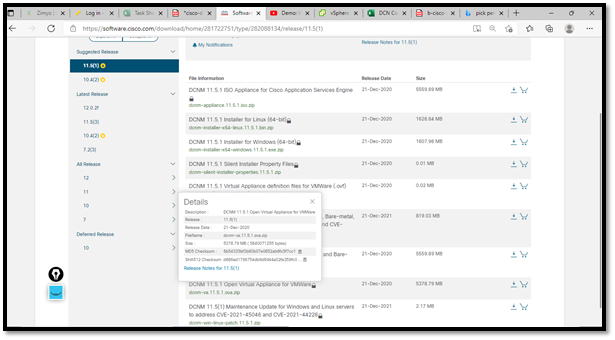
Step3
Locate the DCNM open virtual Appliance Installer then click the Download Button.
Step 4
Save the downloaded OVA file in your storage space that is easy to find whenever you start to deploy the OVF template.
Second
In this session, we will be discussing how to deploy OVA as an OVF Template. And one more thing you must deploy the OVF template from the vSphere Client application or the vCenter Server.
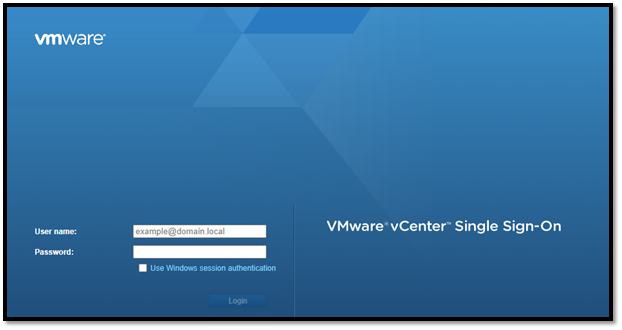
Step 1
Open the vCenter Server application and put the user credentials.
ESXI host must add to the vCenter Server application.
If you want to deploy the OVF template using ESXi 6.7, the installation may fail if you use the Internet Explorer browser with HTML5. Make sure that you one of the following options to successfully deploy the OVF template with ESXi and 6.7:
- Mozilla Firefox browser, with HTML 5 support. (Use flex interface if HTML 5 is not supported)
- Mozilla Firefox browser, with flex/flash support
- Google Chrome browser, with HTML 5 support, (Use flex interface if HTML 5 is not supported)
Step2
Click the Home tab then select Inventory then select Hosts and Clusters and choose the host on which the OVF template is deployed.

Step 3
Then go to correct Host then right-click and select Deploy OVF Template.
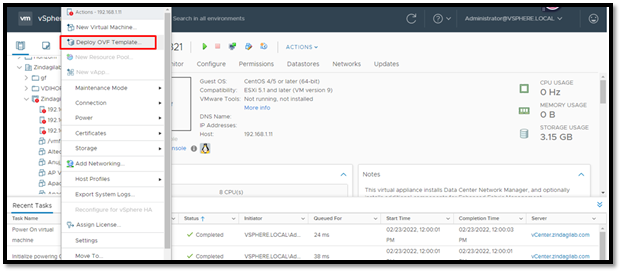
You can also choose Actions—Deploy OVF Template. Then Deploy OVF Template Wizard opens.
Step 4
Select the template screen and navigate to the location where you downloaded the OVA image.
You can choose the OVA file by two methods.
In First Method, you can select the ova file from your Local PC.
In the second method, you can give a URL. But in this blog, we are discussing the first method.
Select the Local file button. Navigate to the direction where the image is stored. Then click OK

Click Next.
Step4
Check the OVA template details then click Next.
Step5
End-user Agreement screen will appear,
Click Accept —-click Next
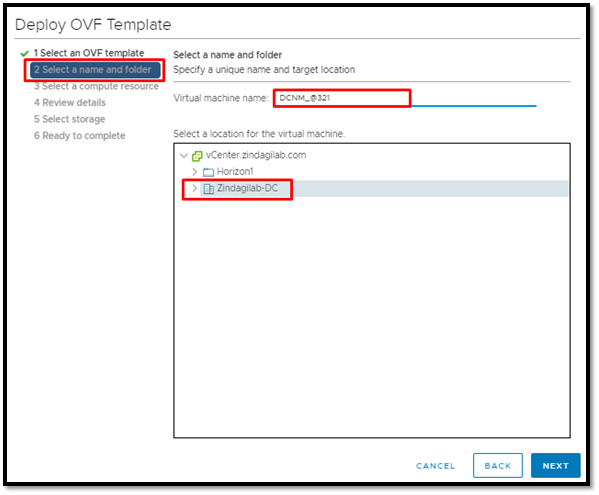
Step6
Give the name and location screen, enter the following information:
. In the Name field, enter an appropriate for the OVF.
Note- (make sure that the VM name must be unique within the Inventory).
. Click the Browse tab, select Datacenter as the deployment location under the appropriate Esxi host.
Then click Next.
Step7
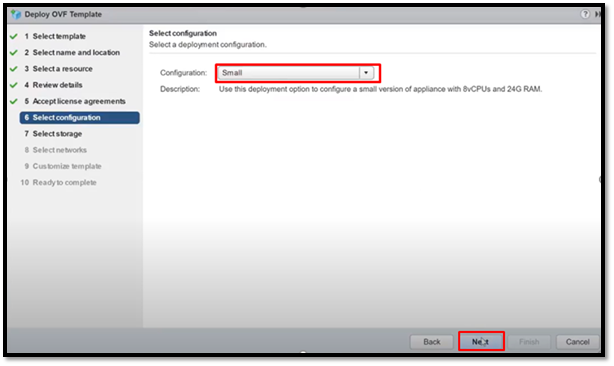
Set the configuration screen and select the configuration from the drop-down list.
There are show some types of options
a). small (choose this option when you configure the virtual machine with 8 vCPUs, 24GB RAM.)
b). Large (choose this option when you configure the virtual machine with 16 vCPUs, 32GB RAM.)
c). Compute (To configure the virtual machine with 16 vCPUs, 64GB RAM.)
d). Huge (To configure the virtual machine with 32 vCPUs, 128GB RAM.
e). ComputeHuge( To configure the virtual machine with 32vCPU and 128GB RAM with 2TB disk.
This configuration is recommended when you use the Cisco Network Insight application.
Click Next.
Step 8
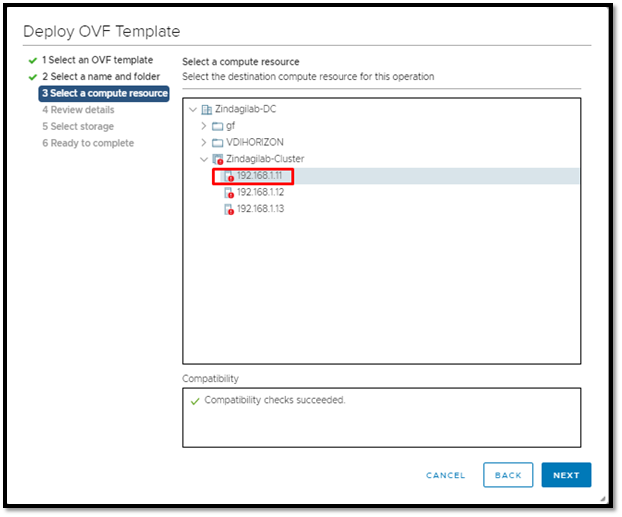
then Select, a resource screen, select the host on which you want to deploy the OVA template.
Click Next.
Step 9
On the Select storage screen, based on the Datastore and Available space choose the disk format and the destination storage for the virtual machine file.
a). From the drop-down menu, choose a virtual disc format.
There are two options
- Lazy Zeroed Thick Provision (The space that is required for the virtual disc is allocated)
- Thin Provision (The disk Space available is less than 100 GB)
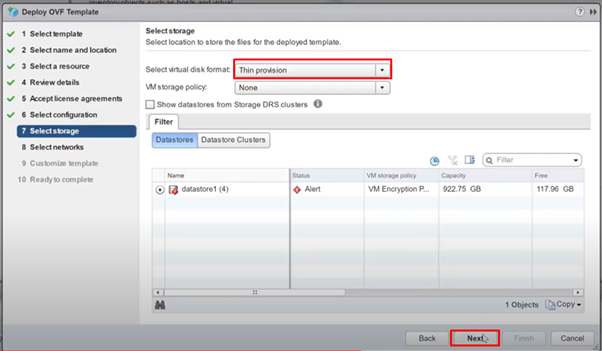
b). Set the VM storage policy from the drop-down list. (By default, no policy is selected.)
c). Check the Show datastores from Storages DRS cluster to view the cluster’ datastore.
d). Select the destination storage for the virtual machine, available in the datastore.
Then Click Next.
Step 10
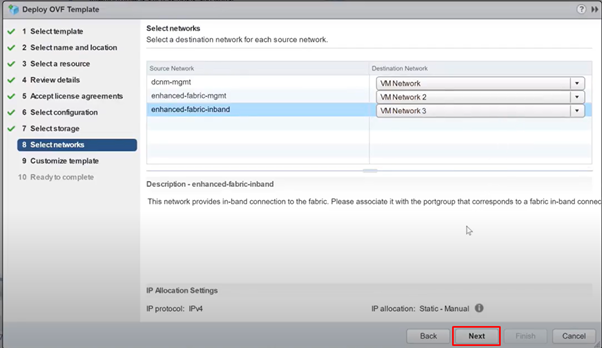
Select the Networks screen, map the network that is used in the OVF template to networks in your inventory.
- Dcnm-mgmt network: – This network connectivity to the Cisco DCNM.
- Enhanced fabric-mgmt: – This network provides enhanced fabric management of Nexus switches.
- Enhanced fabric inband:- This network provides an in-band connection to the fabric. You must associate this network with a port group that corresponds to a fabric in-band connection.
Step 11
On the Ready to Complete screen, review the deployment settings.
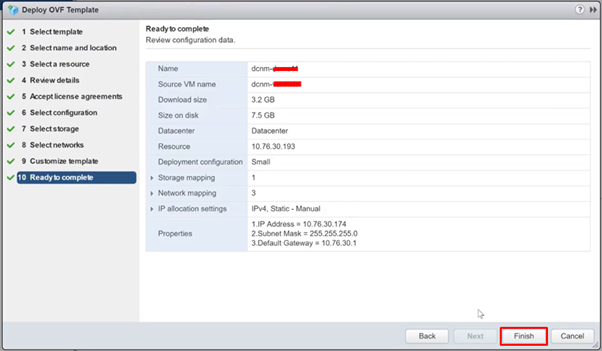
Click Finish
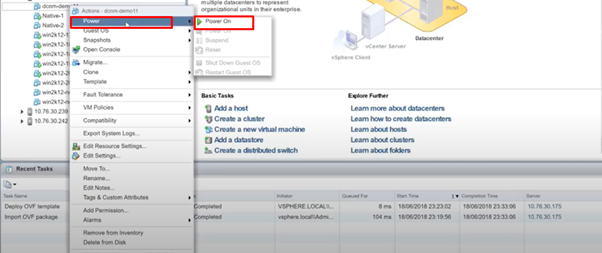
Step 12
After the installation is complete and right-click on the installed VM and select power on.
Step 13
Take a console by GUI.
In this blog, we learned how to install DCNM by OVA file.
Zindagi Technologies Pvt. Ltd. is an IT consulting and professional services organization. We have expertise in designing, planning, and deployment of Network and Security technologies, large-scale data centres, Private/Public/Hybrid cloud computing consultancy. For more details, we are available for you, give us a call on +91-9773973971 or get in touch with us via mail.
Author
Anuj Kumar
Associate Consultant