How to Configure Password-Less SSH
This blog post will explain how:
1. Password based SSH works (briefly),
2. Password-less SSH works differently,
3. To configure it for any Linux based platform,
4. In what scenario should you use it,
5. To revert to the regular SSH.
After reading this blog post you will be able to understand what goes behind making password-less SSH work and get a quick walkthrough on how to configure it for any of your Linux based platforms, what are its advantages and disadvantages and if you ever change your mind, you will know how to go back to the regular password-based SSH.
How Does SSH Work?
SSH stands for Secure Socket Shell, which means all data sent over SSH is encrypted. In order to achieve this encryption, the following three stages are followed:
- Verification of Server: When a client accesses a server for the first time, the client is asked to verify the public key of the server so that the client can authenticate the server. Once the server is verified, its public key is stored in the ~./ssh/know_hosts file.
- Generation of Session Key: After the verification, both client and server will use the Diffie-Hellman key exchange method to negotiate a session key. Now this key is called a Symmetric key which means this will be used for encryption and decryption of the tunnel.
- Authentication of the Client: Now that we have authenticated the server it is time to authenticate the client which will be done using asymmetric keys which means the public key of the client will be used for encryption and the private key (shared with none) is used for decryption.
Once these steps are done, if you have an SSH client you can connect to a machine with an SSH server by providing the password of the requested user. If the password is correct, the server will let you in and you can SSH into that machine. When using password-based authentication, the SSH follows the usual Diffie-Hellman key exchange protocol (explained later) and uses a password once both client and server are authenticated.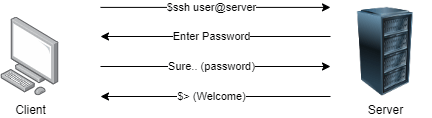
So, while it is best to have long, random, secure passwords with multiple symbols and numbers, we all know that is tough to remember those, and we usually end up writing them down somewhere and that is prone to theft or loss. Also, a password can be guessed, or brute-forced.
How Does Password-Less SSH Work?
To get password-less SSH to work, there needs to be an existing session between the Client and the Server which means the Server needs to have the Clients Public Key stored.
- The Client shares its public key with the server it wishes to connect to.
- Once the server gets that public key it will look in its known_hosts file and finds that key,
- But that is not enough, so the server will encrypt a message using the Client’s public key so that it can authenticate the Client.
- And sends that message to the Client and asks it to decrypt the message. Now that decryption is only possible using a Private Key that is privy only to the Client.
- The Client (if genuine) will decrypt the message and send it back to the Server.
- The Server verifies the decryption and allows the Client with SSH access.
So technically we are still using a password, which was entered when accessing the server for the first time. But using this method we are able to avoid entering the password repeatedly and just use some good old math (encryption and decryption) to authenticate our client.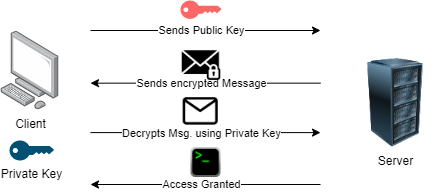
How to Configure Password-Less SSH
First, we need to check if the client already has a set of private/public keys existing. To so we enter this command; If in the output you see any .pub files you are good to go and have no need to follow Step 2.
If the client does not have a set of keys, then we need to create a public/private key pair which is done by entering the following command into the Client machine.
Now we need to copy the client’s public key onto the server using this command and you are good to go.
Once this is done the next time you log in, you will only need to enter this command to SSH to the server and no password will be asked.
When to Use Password-Less SSH
This is mostly used when you have a number of Linux servers to manage and need to have constant access to the servers. As an administrator, it can be an annoying task to not only remember the passwords for all the servers but also painstakingly type them out each time you want to access them. Not to mention the lag when entering the password which can get confusing when you want things done quickly (remember how we discussed a long, secure password for good measure?) and the hidden entry which makes it impossible to see how far along you were while entering your password and you have to start all over again.
With this method all you have to do is enter the password once, follow the commands mentioned, and following which no password input will be needed. For example, in our last blog, we had to update 3 CIMC’s which required constant SSH access of the devices, and using password-less SSH saved a lot of time.
Revert to Password Based SSH
To stop the client from accessing the server without a password, you can perform any one of the following steps:
You can disable the Public Key Authentication on the Client where you do not wish to use it:
Or on the Server you could find and remove the Clients Public Key from its “known_hosts” file:
To Sum It Up
Now we have an understanding of how SSH works at a primary level, what messages are exchanged between the client and the server to establish a connection for the first time based on Public and Private keys, and what are their functionality and where they are stored.
Then we saw how password-less SSH works on top of the regular SSH which means an initial connection is needed, then the server and client share encrypted/decrypted messages to establish a connection for password less entry along with its commands.
If at any time this feature is not suitable, we saw how you can revert to the regular password based SSH with just a few commands. Please feel free to look further into the key exchange process and how encryption is performed.
If you are still unable to solve the problems or need any further suggestions or support, please feel free to reach out to us or call us at +919773973971 we will be glad to help you.
Author
Anant Seth
Network Consulting Engineer