Information About Docker Containers and GUI
We have read about Docker, its terminologies, advantages, and how one can install Docker in the previous blog. In this blog, we are going to continue with Docker and see what containers are and how to install them and how we can use Docker via GUI. In this blog, we will tell you:
- What are containers?
- How to find the containers you want
- How to install containers
- And how to use Docker via GUI
Combining this blog with the previous blog on Docker, you will have a decent primary level understanding of the concepts of Docker, how to install and use it.
Docker Containers
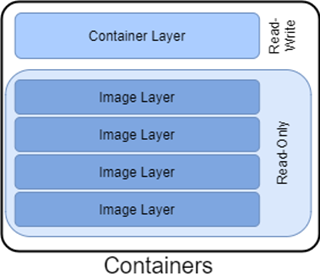
Earlier we mentioned that a repository is kind of an app store for Docker so continuing the same analogy we can say that a container is an app within the app store. One might ask then what are Docker Images? Those can be distinguished based on the understanding that an image is a read-only snapshot of the application which can also be referred to as a template and is inter-changeable whereas a container uses the image to create a writeable version of the image which is executed. A container requires an image to run, not the other way around.
To be precise, we can say that it is an environment where the application runs and it is where the application is provided with all things that it requires to run e.g., if we are running a web application then it may require PHP or some other plugins to run which are provided by the container. Basically, the container provides the application all the dependencies it requires to run within its environment.
Find Containers
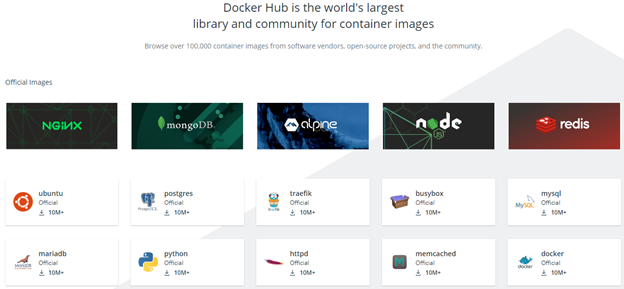
For most purposes, the Docker Hub should suffice as a one-stop shop for sourcing your containers. As we can see the Hub hosts most of the common images which are required for setting up a web/app/DB:
For example, a network engineer uses multiple networking tools on a daily basis. So, they require a container that contains all those tools so that they would not have to install each one of them on their machine. Just by searching for “network tools” on Docker Hub they would get a list of multiple containers which match the criteria from which they select the “praqma/network-multitool” container.
The first part of the name “praqma” indicates the username of the person who has uploaded the container onto the hub and the latter part represents the name of the container. This container has tools such as nslookup, netstat, iperf3, arping, etc., for a full list of the tools please refer to its Docker Hub Page.
Install Containers
To install a container, you will first need to SSH into your device where Docker is installed and then follow these steps:
- Visit the Docker Hub page for the container and look for instructions to install the container because depending on the image there could be multiple requirements and dependencies that need to be configured.
- For our networking tools container, we need to enter the following command to install the container:
a) $ docker run –network host -e HTTP_PORT=1180 -e HTTPS_PORT=11443 -p 1180:1180 -p 11443:11443 -d praqma/network-multitool
b) “-e” represents an environment variable which we are modifying/adding. By default, these tools are accessed on 80/443 ports but since I wish to access the tools from a different port, I explicitly mention the ports 1180 for HTTP access and 11443 for HTTPS access.
c) “-p” represents the port variable that configures the host machine and the container to bind and expose the mentioned ports.
d) Once the command has been entered the host machine will check if an image of the app locally exists on the machine. If not found, then it will fetch it from the Docker Hub.

e) Once downloaded and installed you should see a similar output:
f) To verify if the container has been successfully installed, run the following command: “$docker container ls” and look for this in the output: “5c081619279d praqma/network-multitool “/bin/sh /docker-ent…” 3 minutes ago Up 2 minutes”
g) There are multiple ways to access this container like SSH, HTTP access, attach and bash access but we are going to use this container via the GUI which ultimately uses bash to gain access.
GUI Access
It is similar to a desktop machine which can be controlled via a terminal, Docker can also completely be controlled via its CLI, and most users prefer the CLI access as for a large-scale deployment or repetitive tasks it is easier but, in our scenario, where we have a few containers and require a primary level of understanding, GUI would be simpler to understand and use.
To access Docker via GUI we will use a service called Portainer which will be installed like any other container but through this, we will control and configure other containers.
- To install Portainer run the following commands:
- $ docker volume create portainer_data
- $ docker run -d -p 8000:8000 -p 9000:9000 –name=portainer –restart=always -v /var/run/docker.sock:/var/run/docker.sock -v portainer_data:/data portainer/portainer-ce
- This will install Portainer on your machine and will be accessible on port 9000.
- Once installed head over to the web browser and access it using IP:Port. In our case it is http://192.168.0.197:9000/.
- You will be prompted to set up a username and password and choose the local Docker installation to manage.
- After that navigate to the “local” installation –> Containers where all your installed containers will be listed
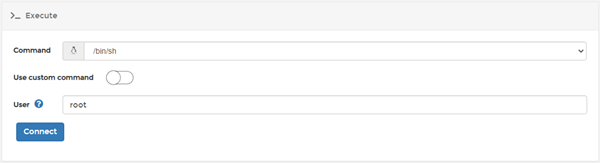
- To access praqma/network-multitool, click on its name (highlighted in blue) and then on Console and then change command to /bin/sh and then click on Connect to get access to the container.
- Once CLI access is granted we can use the tools in the container by simply typing in the command and its parameters as shown below:
Summary
Now that we have covered both parts of the Docker blog you will have a clear understanding of what Docker is, its advantages, how to use it, what are containers, how to install containers, and how we can use Docker via GUI which is better for simplicity and helps one use Docker without having the need to remember all the commands.
The Docker series blog has been written to give you the reader a primary level of understanding about Docker but as we are aware a full SMB or enterprise-level deployment is much more complex and requires solution architecture from the ground up keeping in mind scaling for the future along with actual deployment and daily operations. For this Zindagi Technologies offers its services to enable you to have a flawless cloud-based deployment. So, if you have any queries, comments, or suggestions please feel free to reach out to us at +919773973971.
Author
Anant Seth
Network Consultant Engineer