What Professionals Do When They Have Data Leakage Problems?
Hello friends, today we will look at a very important part of Content security which is critical to a firm. We use DLP (Data Leak Prevention) to prevent data leakage and in this blog, we will work on Data Resolve inDefend DLP.
The DLP (Data Leak Prevention) are of two types: –
- Endpoint DLP (Data Leak Prevention)
- Network DLP (Data Leak Prevention)
Data Resolve inDefend DLP is an endpoint DLP that we used to secure the network from data leakage. We can configure multiple types of policies in this DLP but in this blog, we will focus only on USB block policy.
This endpoint DLP is very useful for those companies, who really want to prevent any data leak. Leakage can be done in multiple ways like:
- An employee can send an email with crucial content of the company to someone.
- Data leakage can be done via file upload to a server or use as an attachment in the email.
- Companies’ private/critical data can be copied to any USB/flash drive, CD/DVD, or to any MTP device.
We can also block unwanted or illegal searches over the internet. For e.g., If an employee does a google search of illegal and unlawful things and the company wants to block those searches as well, then we can achieve this from endpoint DLP.
Requirements: –
- Endpoint DLP works with an agent, the agent needs to be installed on the endpoints. Data Resolve company will give you that agent.
- To install an agent, you will require an installation password. The password is required for both installation and uninstallation and can be set in inDefend (GUI).
- Go to inDefend Settings
- Click on Manage Passwords
- Scroll Down to set Installation and Uninstallation passwords.

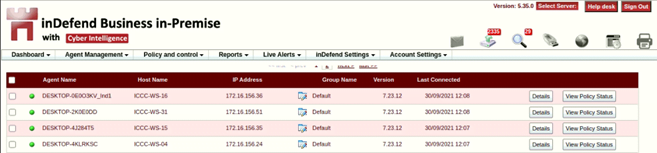
When You successfully installed agents on the workstations, and both are synced successfully then you will check the same in the DLP. Please check the below image:
Media Block Policy Configuration
To configure the Media Block Policy, please follow the steps below:
- Go to Policy and Control > Device Policies
- Click on Device Policy Template
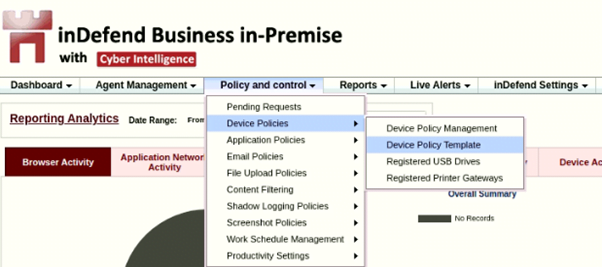
- Click on Create Device Policy Template
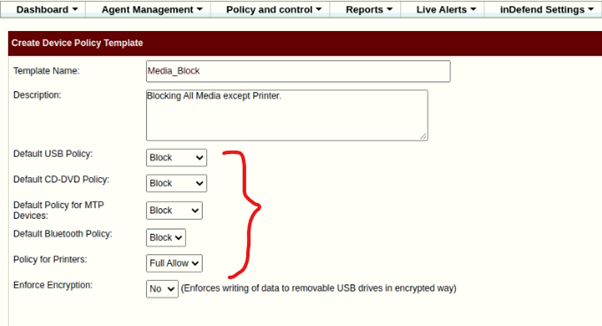
- Give any name <Media_Block>
- If you want to add any description, then you can add.
- Now, here is the magic of Endpoint DLP, you can block USB, CD-DVD, MTP Devices, Bluetooth, and Printers.
- In my case, I am blocking all media except Printer.
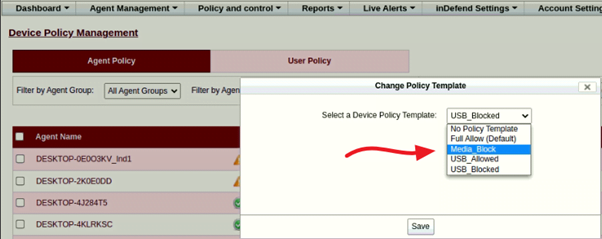
Now, we have just created a template to block the media. We need to do few more steps to accomplish our task.
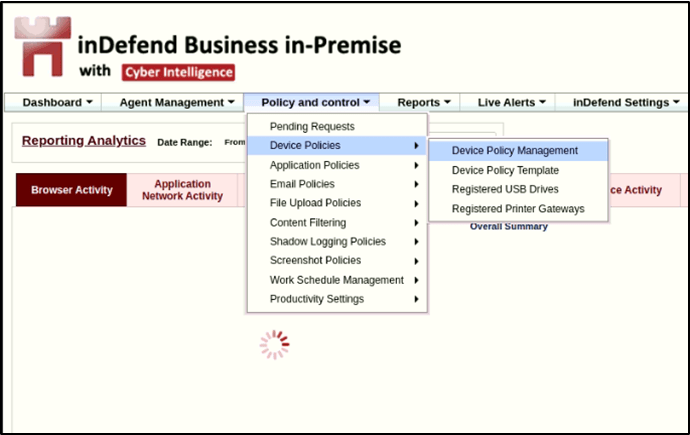
In Device Policy management, you will see all the endpoints on which you have installed the agent.
Here is the main step, to push the policy on all the endpoints via endpoint agent, which was already installed on the endpoints.
To Push a Policy on Endpoint –
- Click on the Pencil icon (Under Device Policy) next to the Desktop on which you want to block the media.
- Select the Policy Template. In my case, it is Media_Block
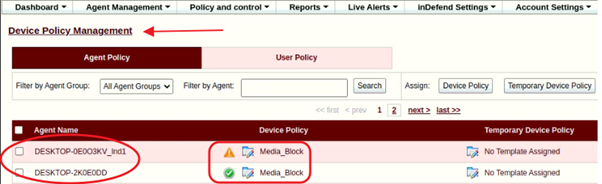
Now, you will see the status of the Device Policy. In the below image, please check the status of both the endpoints, are different.
The first one is status is ‘Yellow Triangle’ which means you applied the policy on the endpoint from the inDefend DLP side but still, it is not synced with the endpoint. Reload the page and check again, if it will remain the same then, the issue may be in your connectivity, or the computer is powered in right now. It can be any issue related to the connectivity. We will not go into that part.
The second Endpoint status is ‘Green’ which means the policy is applied in the DLP and it is synced with the PC or Endpoint as well.
Great! We have successfully implemented the Endpoint DLP with Media Block Policy. Now, if someone wants to try to breach our policy then we will get the alert for the same.
Please check the below image, where we can check the different alerts as per policies

Alerts: –
- Email Incident Alerts
- File upload Incident Alerts
- Search Incident Alerts
- Device Incident Alerts
- Web Browsing Incident Alerts
- Application Incident Alerts
- Printer Incident Alerts
In this blog, we have configured Device Policies to block the media. When someone tries to breach our policy then we will get the alerts in “Device Incident Alerts”.
As I already told you, Content Security is a major part of the Security in a corporate/enterprise network. We must deploy the DLP (Data Leak Prevention) in our network so, we can prevent Data Leakage.
We always say, “Prevention is better than Cure” and DLP is an example for the same.
Thank You, guys! Today, we have learned a very crucial part of the network and I hope, it cleared your doubts and learned a technology of a different vendor.
If you want to read more blogs on Security components (Cisco ISE, Cisco WSA, and FortiGate Firewall) blogs and Beginner and Advance Home Security then please follow the links.
If you are planning to deploy content security for your network, you can always reach out to us, the team at Zindagi Technologies consists of experts in the field of Network Security, Data Centre technologies, Enterprise & Service Provider Networks, Virtualization, Private Cloud, Public Cloud, Data Center Networks (LAN and SAN), Collaboration, Wireless, Surveillance, Openstack, ACI, storage and security technologies with over a 20 years of combined industry experience in planning, designing, implementing and optimizing complex Network Security and VPN deployments. To get in touch with us, you can give us a call at +91 9773973971.
Author
Jagjeet Singh
Senior Network Security Consultant