ASR 9006 Router IOS Upgradation & Package Installation Procedure

In this blog, we will discuss how to install the routing protocols from ASR9K-x64-iosxr-px-k9-7.3.2.tar into the asr9k mini-iOS (asr9k-mini-x64-7.3.2) upgraded version. This installation will help in adding some protocols and features which are not present in the default ASR9K mini IOS XR version. ASR 9006 Router IOS Upgradation & Package Installation Procedure
To upgrade IOS XR from the older version to the latest version (7.3.2) of Aggregation Services Routers 9000 series (ASR9K), use asr9k-x64-usb_boot-7.3.2 USB bootable image. But once you upgrade the IOS XR, many routing protocols will not work like OSPF (Open Shortest Path First), MPLS (Multiprotocol Label Switching), and EIGRP (ENHANCED INTERIOR GATEWAY ROUTING PROTOCOL), IS-IS, etc. To make these protocols work, manually download the .tar file from the Cisco software download site. Now copy and install the .tar file (collection of .rpm files) in the router hard disk of the ASR router. We can install individual .rpm files for each protocol or can install the whole .tar files for all the protocols and features.
Let’s See The Steps For The Successful Completion Of The ASR 9006 Router IOS Upgradation & Package Installation Procedure.
Before starting the installation process of .rpm files, please go through the installation process of the ASR9K IOS XR image from a bootable USB.
Step 1
1. First, download the asr9k-x64-usb_boot-7.3.2 image from the Cisco software download site.
2. Connect the USB drive to your local machine and format it with FAT32 or MS-DOS file system using Windows Operating System.
3. Copy the compressed boot file to the USB drive.
4. Verify whether the copied operation is successful or not. Check and compare the file size at source and destination. Apart from this, verify the MD5 checksum value.
5. Extract the content of the compressed boot file by unzipping it which is present in your USB drive. This helps to convert the USB drive to a bootable drive.
Note
The content of the zipped file (“EFI” and “boot” directories) must be extracted directly into the root of the USB drive.
6. Eject the USB drive from your local machine.
Step 2
Insert the USB on the active RP and reset the power of the router.
Note
Use this procedure only on active RP; the standby RP needs to either be removed from the chassis or stopped at the boot menu. After the active RP is installed with images from USB, then boot the standby RP.
Step 3
On the active XR console, press CTRL-C to view the BIOS menu. From the menu, to upgrade IOS XR from USB, select IOS-XR 64-bit Local boot using front panel USB media.
The previously used boot option is used, if active and standby RPs are not stopped at the boot menu. If the system is inactive in the boot menu for 30 minutes, the system restarts automatically.
Step 4
If standby RP is present and it was stopped in step 2, boot the standby RP after the active RP starts to boot by taking the console of both active & standby RP. In the boot options select IOS-XR 64-bit Internal network boot from RSP/RP.
Installation of Packages in ASR 9006 Router
Step 1
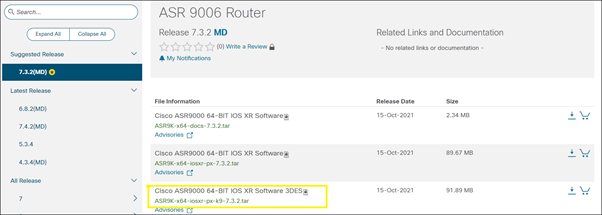
Download the tar file from the Cisco software download site, need a cisco credential to download it.

Step 2
Copy the tar file from the system to a USB device. Check the tar file location (as mentioned in below example)

Step 3
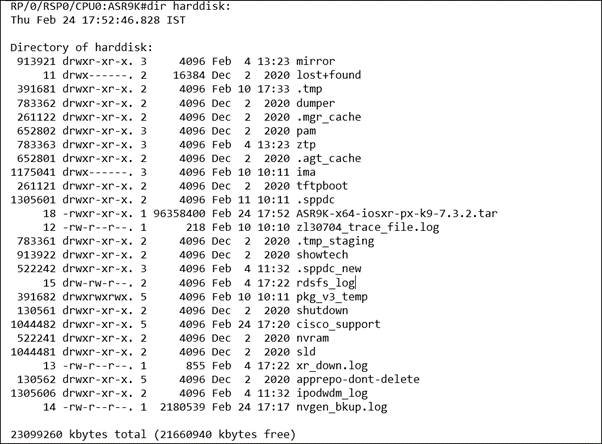
Take console access of ASR and run the command “copy disk2:<ASR9K-x64-iosxr-px-k9-7.3.2.tar> harddisk:” to copy the file to the router hard disk.

Step 4
Check the copy file in the router hard disk.

Step 5
Install the copied package from the Hard disk.

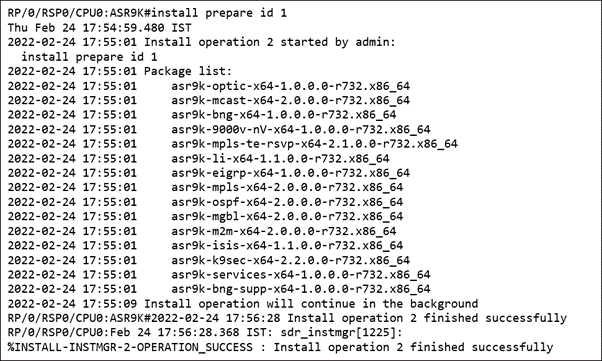
Step 6
Prepare the packages added in the previous step:


Step 7
Activate all the packages:

Step 8
Verify that all the packages are installed correctly in XR and Sysadmin:
RP/0/RSP0/CPU0:ASR9K#show install active
Thu Feb 24 18:27:02.741 IST
Label: 7.3.2
Node 0/RSP0/CPU0 [RP]
Boot Partition: xr_lv0
Active Packages: 16
asr9k-xr-7.3.2 version=7.3.2 [Boot image]
asr9k-mpls-x64-2.0.0.0-r732
asr9k-mpls-te-rsvp-x64-2.1.0.0-r732
asr9k-mgbl-x64-2.0.0.0-r732
asr9k-mcast-x64-2.0.0.0-r732
asr9k-ospf-x64-2.0.0.0-r732
asr9k-services-x64-1.0.0.0-r732
asr9k-k9sec-x64-2.2.0.0-r732
asr9k-optic-x64-1.0.0.0-r732
asr9k-bng-supp-x64-1.0.0.0-r732
asr9k-li-x64-1.1.0.0-r732
asr9k-9000v-nV-x64-1.0.0.0-r732
asr9k-eigrp-x64-1.0.0.0-r732
asr9k-isis-x64-1.1.0.0-r732
asr9k-m2m-x64-2.0.0.0-r732
asr9k-bng-x64-1.0.0.0-r732
Node 0/RSP1/CPU0 [RP]
Boot Partition: xr_lv0
Active Packages: 16
asr9k-xr-7.3.2 version=7.3.2 [Boot image]
asr9k-mpls-x64-2.0.0.0-r732
asr9k-mpls-te-rsvp-x64-2.1.0.0-r732
asr9k-mgbl-x64-2.0.0.0-r732
asr9k-mcast-x64-2.0.0.0-r732
asr9k-ospf-x64-2.0.0.0-r732
asr9k-services-x64-1.0.0.0-r732
asr9k-k9sec-x64-2.2.0.0-r732
asr9k-optic-x64-1.0.0.0-r732
asr9k-bng-supp-x64-1.0.0.0-r732
asr9k-li-x64-1.1.0.0-r732
asr9k-9000v-nV-x64-1.0.0.0-r732
asr9k-eigrp-x64-1.0.0.0-r732
asr9k-isis-x64-1.1.0.0-r732
asr9k-m2m-x64-2.0.0.0-r732
asr9k-bng-x64-1.0.0.0-r732
Node 0/0/CPU0 [LC]
Boot Partition: xr_lv0
Active Packages: 16
asr9k-xr-7.3.2 version=7.3.2 [Boot image]
asr9k-mpls-x64-2.0.0.0-r732
asr9k-mpls-te-rsvp-x64-2.1.0.0-r732
asr9k-mgbl-x64-2.0.0.0-r732
asr9k-mcast-x64-2.0.0.0-r732
asr9k-ospf-x64-2.0.0.0-r732
asr9k-services-x64-1.0.0.0-r732
asr9k-k9sec-x64-2.2.0.0-r732
asr9k-optic-x64-1.0.0.0-r732
asr9k-bng-supp-x64-1.0.0.0-r732
asr9k-li-x64-1.1.0.0-r732
asr9k-9000v-nV-x64-1.0.0.0-r732
asr9k-eigrp-x64-1.0.0.0-r732
asr9k-isis-x64-1.1.0.0-r732
asr9k-m2m-x64-2.0.0.0-r732
asr9k-bng-x64-1.0.0.0-r732
Node 0/1/CPU0 [LC]
Boot Partition: xr_lv0
Active Packages: 16
asr9k-xr-7.3.2 version=7.3.2 [Boot image]
asr9k-mpls-x64-2.0.0.0-r732
asr9k-mpls-te-rsvp-x64-2.1.0.0-r732
asr9k-mgbl-x64-2.0.0.0-r732
asr9k-mcast-x64-2.0.0.0-r732
asr9k-ospf-x64-2.0.0.0-r732
asr9k-services-x64-1.0.0.0-r732
asr9k-k9sec-x64-2.2.0.0-r732
asr9k-optic-x64-1.0.0.0-r732
asr9k-bng-supp-x64-1.0.0.0-r732
asr9k-li-x64-1.1.0.0-r732
asr9k-9000v-nV-x64-1.0.0.0-r732
asr9k-eigrp-x64-1.0.0.0-r732
asr9k-isis-x64-1.1.0.0-r732
asr9k-m2m-x64-2.0.0.0-r732
asr9k-bng-x64-1.0.0.0-r732
Node 0/2/CPU0 [LC]
Boot Partition: xr_lv0
Active Packages: 16
asr9k-xr-7.3.2 version=7.3.2 [Boot image]
asr9k-mpls-x64-2.0.0.0-r732
asr9k-mpls-te-rsvp-x64-2.1.0.0-r732
asr9k-mgbl-x64-2.0.0.0-r732
asr9k-mcast-x64-2.0.0.0-r732
asr9k-ospf-x64-2.0.0.0-r732
asr9k-services-x64-1.0.0.0-r732
asr9k-k9sec-x64-2.2.0.0-r732
asr9k-optic-x64-1.0.0.0-r732
asr9k-bng-supp-x64-1.0.0.0-r732
asr9k-li-x64-1.1.0.0-r732
asr9k-9000v-nV-x64-1.0.0.0-r732
asr9k-eigrp-x64-1.0.0.0-r732
asr9k-isis-x64-1.1.0.0-r732
asr9k-m2m-x64-2.0.0.0-r732
asr9k-bng-x64-1.0.0.0-r732
Step 9
Execute ‘install commit’ to commit the newly active software (install commit is required after any install activate operation else after the router reloads, nodes will go back to previously committed software):
RP/0/RSP0/CPU0:ASR9K #install commit
In this blog, we have understood the procedure to upgrade the IOS XR image in the ASR 9006 router and the installation process of packages, which are by default not present in mini IOS XR images.
Zindagi Technologies consists of experts in the field of Network Security, Data Centre technologies, Enterprise & Service Provider Networks, Virtualization, Private Cloud, Public Cloud, Data Center Networks, Collaboration, Wireless, Surveillance, and ACI (Application Centric Infrastructure), storage, and security technologies. With our help, you can take your business mile-mile ahead. To know more Contact Us or drop a message at +91 9773973971.
Author
Prakash Raghav
Senior Consultant Enterprise Networking

Aparna
January 23, 2023Can you share steps to upgrade from 32 bit to 64 bit os
Prakash Raghav
January 25, 2023Hi Aparna,
You can follow the below link for migrate to 64 bit OS..
https://www.cisco.com/c/en/us/td/docs/routers/asr9000/migration/guide/b-migration-to-ios-xr-64-bit/m-migrate-iosxr-to-iosxr-64bit.html#id_33482