Setting up Cisco Meeting Server – Part 2
In the last blog, we covered the basic setup of the Cisco Meeting Server. In this blog, we will discuss CMS Cluster. In this article, we will cover Database Clustering, Call Bridge clustering, and XMPP Clustering.
For database clustering, you require a minimum of 2 Cisco Meeting Servers or when you have at least 2 call bridges.
When you go through the documentation, you will find out that to make a database cluster you need a minimum of 3 CMS nodes. Do not get confused, the 3rd CMS Virtual machine can be created without a license. You do not need to license the 3rd CMS.
Database Clustering
Now to create a database cluster of CMS you need to begin with Certificates.
Step 1. Generate CSR on CMSDB node.
pki csr DBClient CN:postgres
pki csr DBserver CN:CMSDB.DOMAIN.com subjectAltName:CMS1.DOMAIN.com,CMS2.DOMAIN.com
Step 2. Get the CSR from WinSCP and get them signed and put the Server certificates and root certificates back through WinSCP on the CMSDB node.
Step 3. Assign certs
database cluster certs DBserver.key DBServer.cer DBClient.key DBClient.cer RoootCA.cer
database cluster localnode a
Step 4. Initialize the Database cluster.
database cluster initialize
Step 5. Now you can create separate certificates for the rest nodes and you can use the same keys and certificates on other nodes for the database cluster.
Go to CMSDB through WinSCP and copy all DBServer, DBClient keys, and Certificates and put them in the rest of CMS Nodes.
Perform step 3
Step 6. Join rest CMS nodes in a database cluster.
database cluster join <CMSDB IP ADDRESS>
Step 7. Verify the cluster status from all nodes by using the command “database cluster status“
Call Bridge Clustering
Now to form a callbridge cluster, you don’t need CMSDB. We recommend that you disable the Web admin of CMSDB.
When you login to any of other CMS nodes, Go to Configuration > Cluster Settings
Add the Callbridges there using unique callbridge name, Address as “https:// <cms ip address:<web admin port>” on all nodes.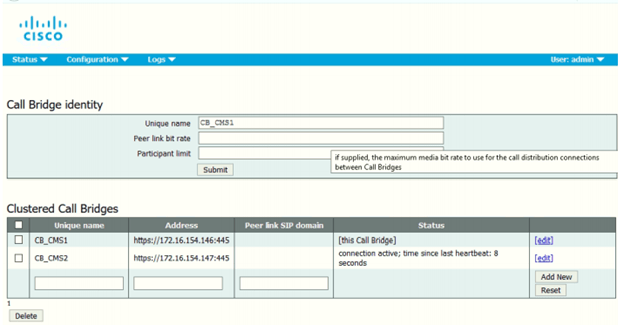
XMPP Clustering
Now to create an XMPP cluster, follow the below steps.
Step 1. In case any node has previously been configured for XMPP, reset the XMPP configuration on every node, run the next command:
xmpp reset
Step 2. Assign the XMPP domain to be used, run the next command:
xmpp domain <domain-name>
Step 3. Setup the interfaces for the XMPP server to listen on, run the next command:
xmpp listen <interface allowed list>
Step 4. Create a new Certificate Signing Request (CSR) for the XMPP service. To avoid client certificate errors, ensure that CSR specifies the next:
The DNS record created for XMPP is contained within the Common Name (CN) field or in the Subject Alternative Name (SAN) field
XMPP server’s domain name is contained in the SAN field
In order to create the CSR, run the next command:
pki csr xmppserver CN:xmpp.example.com subjectAltName: example.com
Step 5. Sign the CSR with the Certificate Authority (CA) of your preference.
Step 6. When the certificate is already signed, submit the file to the CMS via SFTP client of your preference.
Step 7. Assign the private key, the signed certificate, and the certificate bundle as provided by your CA. Run the next command:
xmpp certs <keyfile> <certificatefile> <cert-bundle>
Step 8. Repeat steps from 2 to 7 on the rest of the CMS servers you want to merge in the XMPP cluster.
Step 9. A certificate bundle needs to be created with all XMPP certificates for each server. There are 3 options using either Linux, Windows or manually combine them using a text editor. Make sure there are no spaces.
Step 10. Upload the bundle certificate on every CMS node.
Step 11. On every CMS node, assign the uploaded certificate using the command
xmpp cluster trust xmppbundle.cer (xmpp bundle cert name)
Step 12. Now enable the XMPP cluster
xmpp to enable
Step 13. Add callbridges to XMPP cluster
xmpp callbridge add CB_CMS01
xmpp callbridge add CB_CMS02
Step 14. Copy secret key and configure this on CMS GUI
Step 15. Disable xmpp
xmpp disable
Step 16. Enable xmpp cluster
xmpp cluster enable
Step 17. Initialize xmpp cluster
xmpp cluster initialize
Step 18. Enable xmpp
xmpp enable
Step 19. Verify the cluster status
xmpp cluster status
The above steps cover Cisco Meeting Server Database, Callbridge, and XMPP clustering. We hope this article gives you an understanding of the clustering of covered components in the Cisco Meeting Server.
Zindagi can help you in giving the right consulting, advisory, and professional services to deploy a Collaboration Environment for your organization. Having a combined experience of more than 2 decades, we have been delivering the best results.
Zindagi Technologies Pvt. Ltd. is an IT consultancy and professional services organization based out of New Delhi, India. We have expertise in planning, designing, and deployment of collaboration environments, large-scale data centers, Private/Public/Hybrid cloud solutions. We believe in “Customer First” and provide quality services to our clients always.
Author
Rahul Bhukal
Sr. Collaboration Consultant