CISCO DNA CENTER WORKFLOW – PROVISION
This blog is a continuation of our CISCO DNA CENTER WORKFLOW SERIES. Previously, we had explained about CISCO DNA WORKFLOW – DESIGN and CISCO DNA WORKFLOW – POLICY. In this part 3 of the series, we will cover 3rd pillar of the CISCO DNA CENTER WORKFLOW that is “PROVISION”.
PROVISION
We use Cisco DNA Center ‘PROVISION’ tab to configure and provision network devices in an automated way. To configuring in desired and effective way DNAC uses 4 simple steps.
After completing the Network Hierarchy, Network Settings, and other Global settings which we have to discuss in the DESIGN section in the blog series, we configured network policies as per our requirement in the POLICY tab, it’s time to configure devices with design and policy tab settings.
So, we’ll configure devices via the following simple steps.
– Onboarding devices with Plug and Play
– Deploying the required settings and policies to devices
– Adding devices to the site
– Creating fabric and adding a device to the fabric
Step 1 – Onboarding Devices
To take an advantage of DNAC we must onboard the devices in the inventory section. The devices which are not yet configured can be automatically configured and added to DNAC through the PnP tool using zero tough provisionings. ZTP only work for those devices which is compatible with DNAC you can find the list of the device at Cisco DNA Center Supported Devices.
We need to discover the devices, there is three-way to discover.
Go to DNA Center homepage >> Tools >> Discovery >> Add Discovery
- Using CDP
- IP address/Range
- LLDP
You can choose any of them as per your discovery environment. By default, the device controllability feature is enabled, hence it pushes some basic config to newly discovered devices. We’ll cover the detailed discovery process in upcoming blogs.
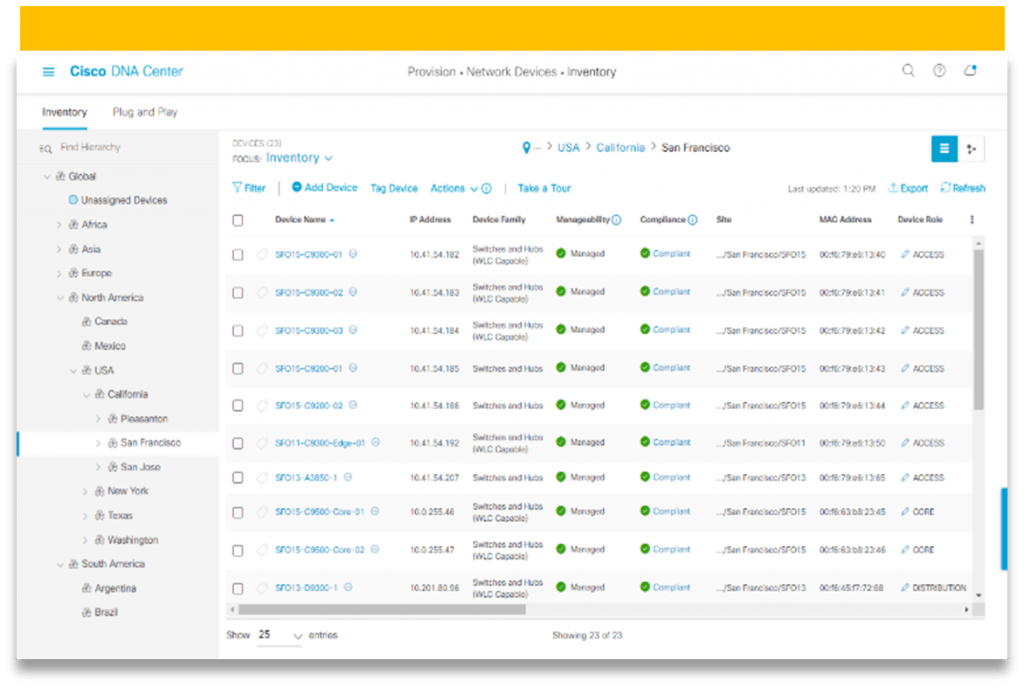
After performing the discovery, the dashboard shows all discovered devices and past discovered devices, and all newly discovered devices will automatically be added to inventory and Previous discovery will already exist in the inventory list.
You can go to inventory via DNAC home page >> provision >> inventory.
The inventory list shows some basic but very important information that includes,
1. Hostname
2. IP address
3. Reachability status
4. Software version
5. Platform
6. Serial number
7. Mac address
8. Up time
9. Resync interval
10. Device series
11. Platform
Step 2 – Deploying The Required Settings And Policies
DNAC can push configuration to multiple devices at the same time easily and quickly, configuration changes can be sent/deploy to the device immediately or we can even schedule DNAC to push the configuration in advance.
After adding devices to inventory, complete the provisioning process via going to the Inventory tab select the devices, and click the action > provision > provision device and proceed through all steps then you’ll find the summary tab and verify all the configurations you have made and click deploy.
“Don’t forget to select similar devices together, only similar devices can be configuring together as you can select switches more than one at a time and it works, on the other hand, you can’t select different devices and provisions them together. You cannot select switches + wireless LAN controller and provision both types of devices together”.
Likewise, we can configure multiple devices with Cisco DNA Center
1. Can provision a Cisco AireOS controller.
2. It also supports Brownfield Cisco AireOS Controllers.
3. Can provision a Cisco AP—Day 1 AP Provisioning.
4. Can configure day 0 Workflow for Cisco AireOS Mobility Express APs.
5. Can provision a Meraki Device.
6. And can also delete a Device After Provisioning.
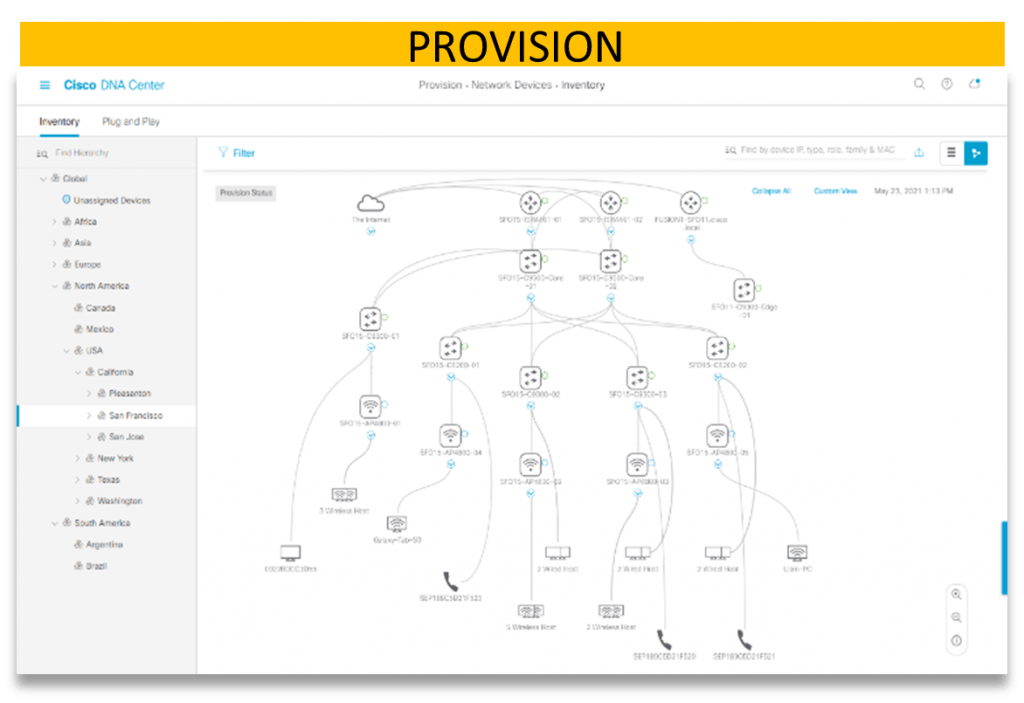
Step 3 – Adding Devices To Site
Devices can assign to the site using a topology map, before assigning devices to the site make sure all the devices are in your inventory and have some basic configuration. Which is done by DNAC at the time of onboarding via PnP.
If devices are not showing in inventory, then use the discovery feature and re-discover all the devices.
1. Very first you need to go to menu >> tools >> topology
2. Click on unassigned devices, all unassigned devices shown in the topology area
3. Click the device on which you want to assign the site, a pop-up window appears, and ask you for the specific site where this device will be placed with a dropdown site detail list as per your design.
4. Then click assign.
Step 4 – Creating Fabric And Adding A Device To The Fabric.
Fabric is an overlay network. Overlay networks usually use to connect virtual connections between devices.
Like: GRE, DMVPN, MPLS, LISP, IPSec, etc.
Creating a fabric is the easiest task of the process, you only need three parameters
1. Fabric name
2. Fabric location
3. VNs which will be part of the fabric
Step-1 Go to menu >> provision >> fabric.
Step-2 Add fabric or transit/peer network.
Step-3 Enter fabric name.
Step-4 Choose one fabric site and click add.
Adding Devices To The Fabric
After creating the fabric domain, now it’s time to add devices to fabric sites, and we can also specify which device should act as what role in the SD-Access environment. E.g., Edge node, Control plain node, Border node (internal, external, or both)
The Procedure Is Given Below Stepwise
Step-1 In DNAC home page Go to menu >> provision >> fabric >> choose the fabric. Hare all the devices shows in grey color.
Step-2 In the list of all devices, click on any device and a detailed window will appear for that specific device, you’ll found detailed info about that device in the fabric section you can assign the roles of devices as B|C|Edge.
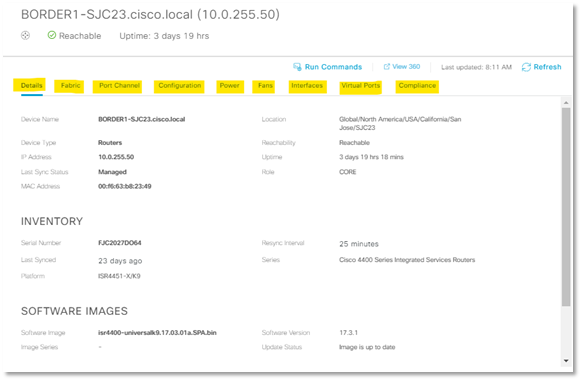
Finally, click add and in the fabric, you’ll see that device in blue color with their roll tag it means the device is added and configured for fabric, do the same for all devices.
We have a team of certified Subject Matter Experts with having specialization in SD-Access solutions. With our help, you will be able to grow as a business. Our help is what you need in Planning / Designing / Implementation / PoC services for SD-Access and other components too. Give us a call on +919773973971 or we can get in touch to discuss further planning, implementation, and collaboration.
Author
Ravi Kumar Singh
Network Consulting Engineer