How to set up an HA Kubernetes Cluster Using Keepalived & HAproxy?

A highly available Kubernetes cluster ensures your applications run without outages which are required for production. In this connection, there are plenty of ways for you to choose from to achieve high availability.
This tutorial demonstrates how to configure Keepalived and HAproxy for load balancing and achieve high availability. The steps are listed below:
- Prepare hosts.
- Configure Keepalived and HAproxy.
- Use KubeKey to set up a Kubernetes cluster and install KubeSphere.
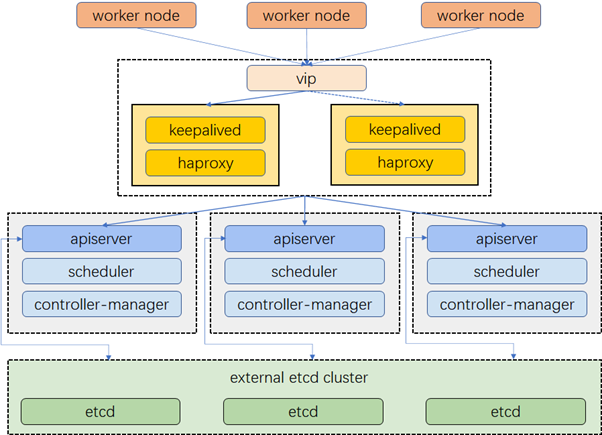
Cluster Architecture
The example cluster has three master nodes, three worker nodes, two nodes for load balancing and one virtual IP address. The virtual IP address in this example may also be called “a floating IP address”. That means in the event of node failures, the IP address can be passed between nodes allowing for failover, thus achieving high availability.
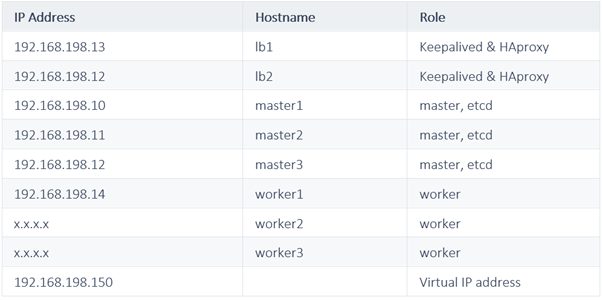
Prepare Hosts:
Configure Load Balancing:
Keepalived provides a VRPP implementation and allows you to configure Linux machines for load balancing, preventing single points of failure. HAProxy, providing reliable, high-performance load balancing, works perfectly with Keepalived.
As Keepalived and HAproxy are installed on lb1 and lb2, if either one goes down, the virtual IP address (i.e. the floating IP address) will be automatically associated with another node so that the cluster is still functioning well, thus achieving high availability. If you want, you can add more nodes all with Keepalived and HAproxy installed for that purpose.
Run the following command to install Keepalived and HAproxy first. (lb1 and lb2) both
apt install keepalived haproxy –y
HAproxy Configuration
- The configuration of HAproxy is exactly the same on the two machines for load balancing. Run the following command to configure HAproxy.
vi /etc/haproxy/haproxy.cfg
- Here is an example configuration for your reference (Pay attention to the
serverfield. Note that6443is theapiserverport):
vi /etc/haproxy/haproxy.cfg
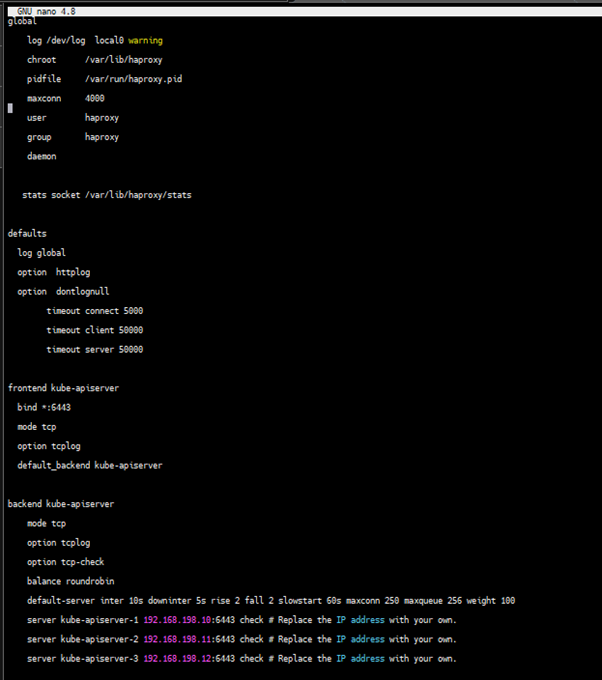
global
log /dev/log local0 warning
chroot /var/lib/haproxy
pidfile /var/run/haproxy.pid
maxconn 4000
user haproxy
group haproxy
daemon
stats socket /var/lib/haproxy/stats
defaults
log global
option httplog
option dontlognull
timeout connect 5000
timeout client 50000
timeout server 50000
frontend kube-apiserver
bind *:6443
mode tcp
option tcplog
default_backend kube-apiserver
backend kube-apiserver
mode tcp
option tcplog
option tcp-check
balance roundrobin
default-server inter 10s downinter 5s rise 2 fall 2 slowstart 60s maxconn 250 maxqueue 256 weight 100
server kube-apiserver-1 172.16.0.4:6443 check # Replace the IP address with your own.
server kube-apiserver-2 172.16.0.5:6443 check # Replace the IP address with your own.
server kube-apiserver-3 172.16.0.6:6443 check # Replace the IP address with your own.
- Save the file and run the following command to restart HAproxy.
systemctl restart haproxy
- Make it persist through reboots:
systemctl enable haproxy
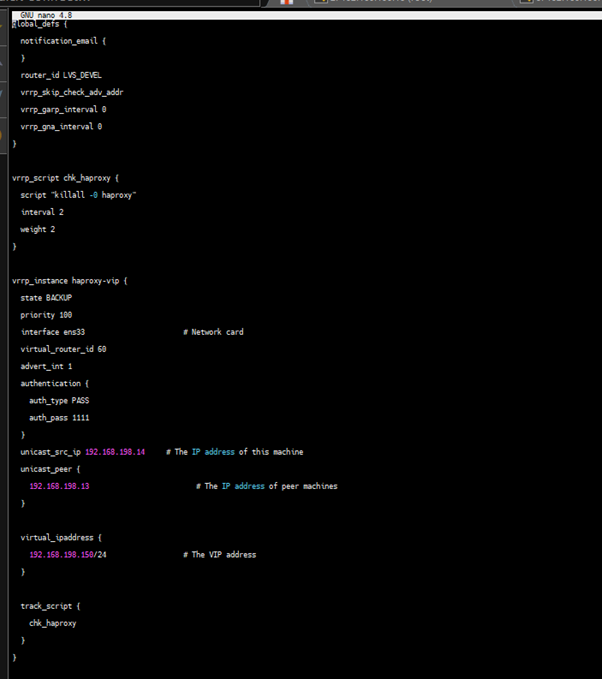
Keepalived Configuration
Keepalived must be installed on both machines while the configuration of them is slightly different. lb1 & lb2 both
- Run the following command to configure Keepalived.
vi /etc/keepalived/keepalived.conf
lb1

lb2
Save the file and run the following command to restart Keepalived
systemctl restart keepalived
systemctl enable keepalived
Verify High Availability
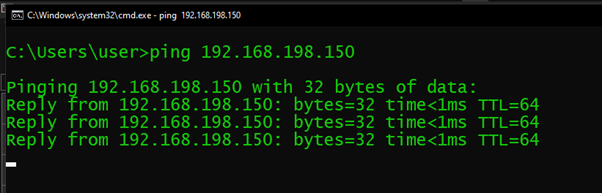
Our lb-vip is pinging :
Use KubeKey to Create a Kubernetes Cluster
Download KubeKey from its GitHub Release Page or use the following command directly.
curl -sfL https://get-kk.kubesphere.io | VERSION=v3.0.2 sh –
Make kk executable:
chmod +x kk
Create an example configuration file with default configurations. Here Kubernetes v1.22.12 is used as an example.
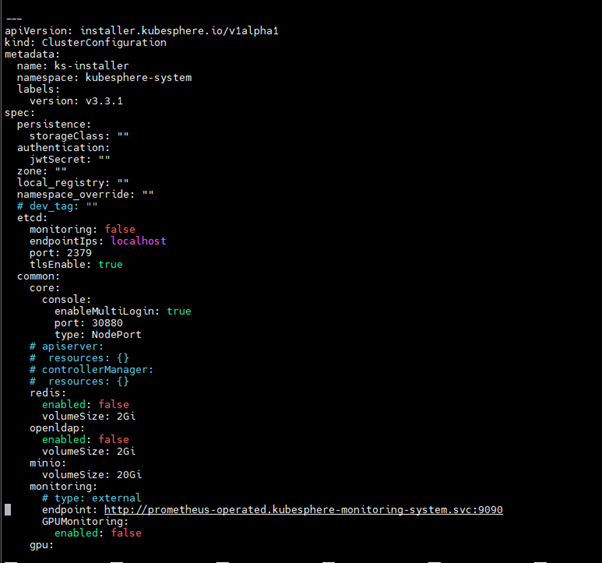
./kk create config –with-kubesphere v3.3.1 –with-kubernetes v1.22.12

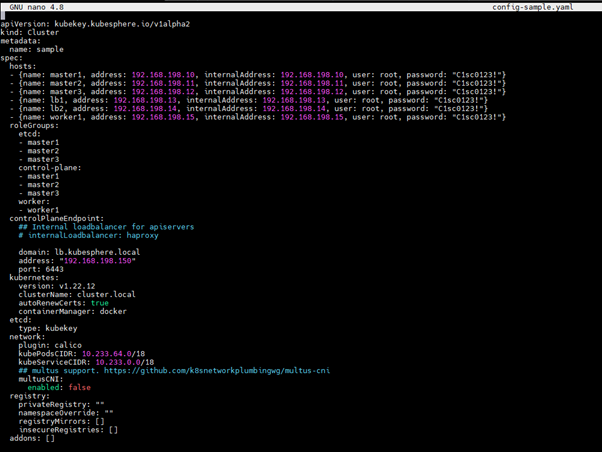

Config main changes parts:
…
spec:
hosts:
– {name: master1, address: 172.16.0.4, internalAddress: 172.16.0.4, user: root, password: Testing123}
– {name: master2, address: 172.16.0.5, internalAddress: 172.16.0.5, user: root, password: Testing123}
– {name: master3, address: 172.16.0.6, internalAddress: 172.16.0.6, user: root, password: Testing123}
– {name: worker1, address: 172.16.0.7, internalAddress: 172.16.0.7, user: root, password: Testing123}
– {name: worker2, address: 172.16.0.8, internalAddress: 172.16.0.8, user: root, password: Testing123}
– {name: worker3, address: 172.16.0.9, internalAddress: 172.16.0.9, user: root, password: Testing123}
roleGroups:
etcd:
– master1
– master2
– master3
control-plane:
– master1
– master2
– master3
worker:
– worker1
– worker2
– worker3
controlPlaneEndpoint:
domain: lb.kubesphere.local
address: 172.16.0.10 # The VIP address
port: 6443
…
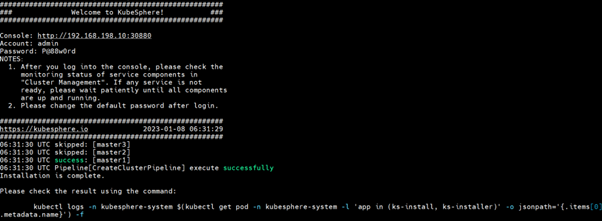
Start installation
./kk create cluster -f config-sample.yaml
Depending upon your resources and internet speed at the end you will see something like this:
After successfully creating the cluster restart the haproxy service in the lb1 node

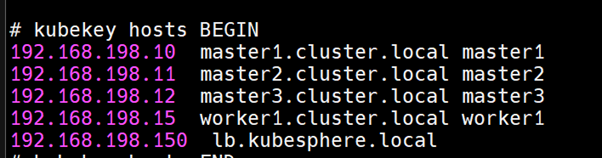
After everything is set up you can find lb-vip host entry in /etc/hosts file:

Now test the high availability
Right now we have 3 master and 1 woker, I will bring down one master and let check if we can access our kubernetes cluster via lb-vip (lb.kubesphere.local)
Before shutting down the master1

After shutting down
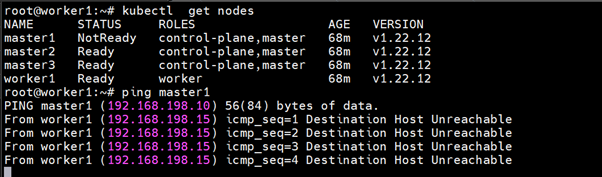
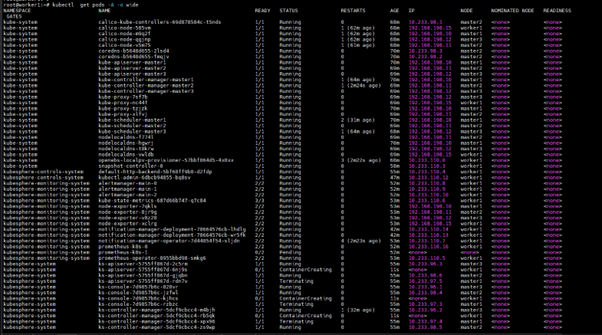
You can see we can still access our Kubernetes cluster :

I hope this blog will be helpful for you to understand the Core Concept of Kubernetes and Its different methodologies which we can use in a production environment.
The goal of this blog is to provide you, the reader, with a fundamental grasp of Ansible. A complete SMB or enterprise-level deployment, on the other hand, is significantly more complicated and needs solution architecture from the ground up, taking into consideration future scalability as well as real deployment and daily operations, as we all know. Zindagi Technologies offers services like a security operation centre, DevOps tools, and many more to aid you in implementing cloud-based applications successfully. If you have any questions, comments, or suggestions, please contact us at +919773973971.
Author
Sourabh Dey
Associate Consultant – Server & Virtualization