Understanding the Boot Process of CentOS/RHEL
Do you know how CentOS/RHEL boots their operating system? If yes, it is very good but if not, it is sad news, because if you are Linux Administrator and you don’t have knowledge about how to operate the system boot you might lack behind in many ways.
Well don’t worry, we have got you covered.
It is very important to understand the CentOS/RH Understanding the CentOS/RHEL Linux operating system boot process is very important EL Linux operating system boot process to troubleshoot boot problems when our system gets the boot. In this blog, we discuss the main and n and high-level steps in the boot process. CentOS/RHEL goes through the boot process when the system is powered up or reset, with the boot process lasting until all enabled services are started and a login prompt appears on the screen.
High-level stages of a typical Linux boot process
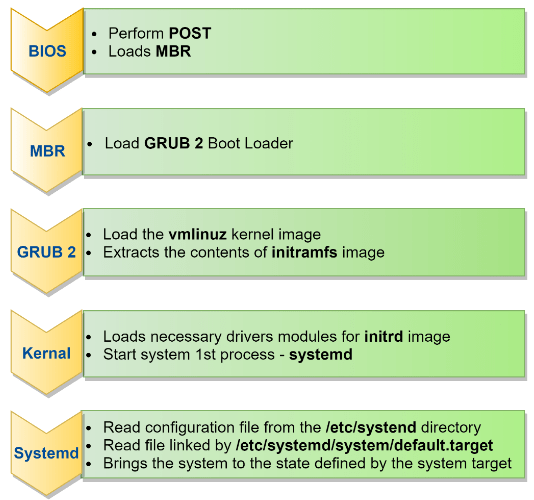
BIOS
- BIOS stands for Basic Input/Output System.
- Perform some system integrity checks.
- Search, Load, and Execute the boot loader program.
- It looks for boot loader in floppy, CD-ROMs, or hard drives.
MBR –
- MBR stands for Master Boot Record.
- It is in the first sector of the bootable disk. Ex- /dev/sda or /dev/had.
- MBR is less than 512 bytes in size.

GRUB2 –
- GRUB stands for Grand Unified Boot Loader.
- GRUB2 replaces the older GRUB bootloader also called legacy GRUB.
- GRUB_CMDLINE_LINUX– which defines how the Linux kernel should be started
- GRUB_TIMEOUT– This defines the amount of time your server waits for you to access the GRUB 2 boot menu before it continues booting automatically
- To write the modified configuration to the appropriate files, you use the grub2- mkconfig
- Open the file /etc/default/grub with an editor and remove the rhgb and quiet options from the GRUB_CMDLINE_LINUX line.
- From the same file, set the GRUB_TIMEOUT parameter to 10 seconds. Save changes to the file and close the editor.
- From the command line, type grub2-mkconfig > /boot/grub2/grub.cfg to write the changes to GRUB 2.
- Reboot and verify that while booting you see boot messages scrolling by.

Note – if changes are made to any of these parameters, you need to run grub2-mkconfig to re-generate the /bootgrub2/grub.cfg
Example – grub2 – mkconfig -o /boot/grub2/grub.cfg
Kernel –
- Linux kernel is the central core of the OS, and it is the first program loaded on the system startup. While the system starting kernel loads all the necessary Kernel Modules and Drivers from initrd.img.
- Always Kernel process id is 1 (PID).

Systemd –
After going to the boot process, you must have knowledge about systemd services.
Basically, it is the most important service manager in CentOS/RHEL operating system. It is used to enable, disable, start, and stop the services in Linux. If you need more detail about systemd services, we have already written a detailed blog on it – “What are Systemd (daemon) services”. It is backward compatible with SysV init. scripts used by the previous version of RHEL Linux including version 6.
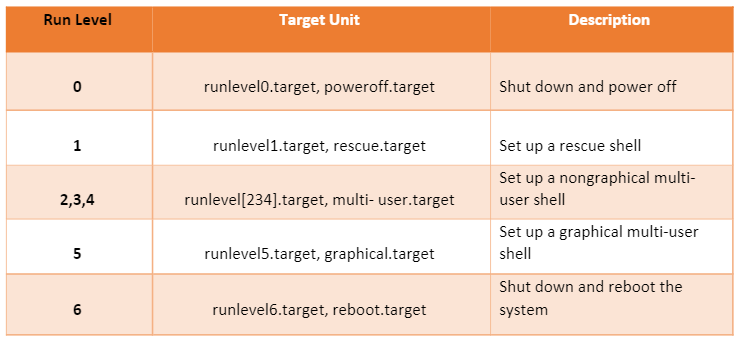
Check default/ Current target unit –
Command – systemctl get-default

Boot Reboot and Shutdown
1st Command – systemctl poweroff will stop all running services. Unmount all file systems only when they cannot be unmounted and then power down the system.
2nd Command – systemctl reboot will all running services, unmount the system, but unlike their power off equivalent.
The following steps summarize how the Boot procedure happens on Linux –
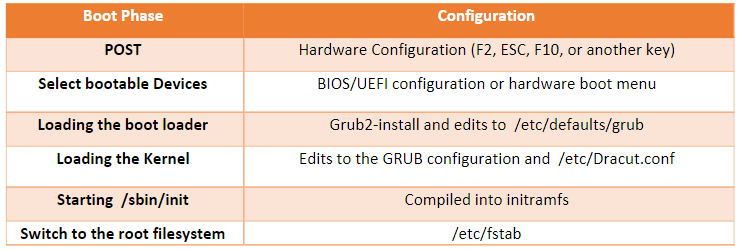
1st – Performing POST –
The machine is powered on. From the system firmware, which can be the modern Universal Extended Firmware Interface (UEFI) or the classical Basic Input Output System (BIOS), the Power-On-Self-Test (POST) is executed, and the hardware that is required to start the system is initialized.
2nd Selected the Bootable device –
Either from the UEFI boot firmware or from the BIOS, bootable devices are located. Once the bootable device is detected and loaded into the memory, BIOS gives control to it.
3rd Loading the boot loader –
From the bootable devices, a boot loader is located. On RHEL, this is usually GRUB2.
4th Loading the Kernel –
The boot loader may present a boot menu to the user or can be configured to automatically start a default operating system. To load Linux, the Kernel is loaded together with the initramfs containing kernel modules for all hardware that is required to boot the initial script required to proceed to the next stage of booting. On RHEL or CentOS, the initramfs contain a complete operational system (which may be used for troubleshooting purposes).
4th Starting /sbin/init –
Once the kernel is loaded into memory, the first process is loaded, but still from the initramfs. This is the /sbin/init process, which on RHEL is linked to Systemd. The udev daemon is loaded as well to take care of further hardware initialization. All this is still happening from the initramfs image.
5th Processing initrd.target –
The Systemd process executes all units from the initrd.target, which prepares a minimal operating environment, where the root file system on disk is mounted on the /sysroot directory. At this point, enough is loaded to pass to the system installation that was written on the hard drive.
6th Switching to the root file system –
The system switches to the root file system that is on disk and at this point can load the Systemd process from disk as well.
7th Running the default target –
Systemd looks for the default target to execute and runs all its units. In this process, a login screen is presented, and the user can authenticate. Note that the login prompt can be prompted before all Systemd unit files have been loaded successfully. So, seeing a login prompt does not necessarily mean that your server is fully operational yet.
The table below summarizes where a specific phase is configured and what you can do to troubleshoot if things go wrong
Zindagi Technologies consists of experts in the field of SD-Access, Data Centre technologies, Virtualization, cloud solutions like Private Cloud, Public Cloud, Data Center services (LAN and SAN), Collaboration, Wireless, Surveillance, Open stack, ACI, storage, and security technologies with over a 20 years of combined industry experience in planning, designing, implementing and optimizing complex Data Centre, campus and cloud deployments.
Author
Deepak Kumar
Consultant – Server & Virtualization
Canadian pharmaceuticals online
August 25, 2022Kudos. Plenty of info.