What Is Cisco SD-Access And The Steps To Set Up SD-Access Fabric?
Cisco Software-Defined Access or SD-Access was created in view of the Cisco Digital Network Architecture (Cisco DNA) standards, which target making venture networks more coordinated, extensible, deftly programming driven, and easier to make do. Cisco DNA is focused on at digitization of an organization through mechanization, confirmation, security, and division of its cycles. What’s more, it is additionally upgraded by SD-access through the arrangement of purpose-based strategy and mechanization for both wired and remote grounds organizations.
What is Cisco DNAC?
Cisco Software-Defined Access adds certain hardware to the network circle in order to virtualize the network. These components will serve as the platform’s layers for software abstraction. They also aid in creating a platform for the implementation of policies.
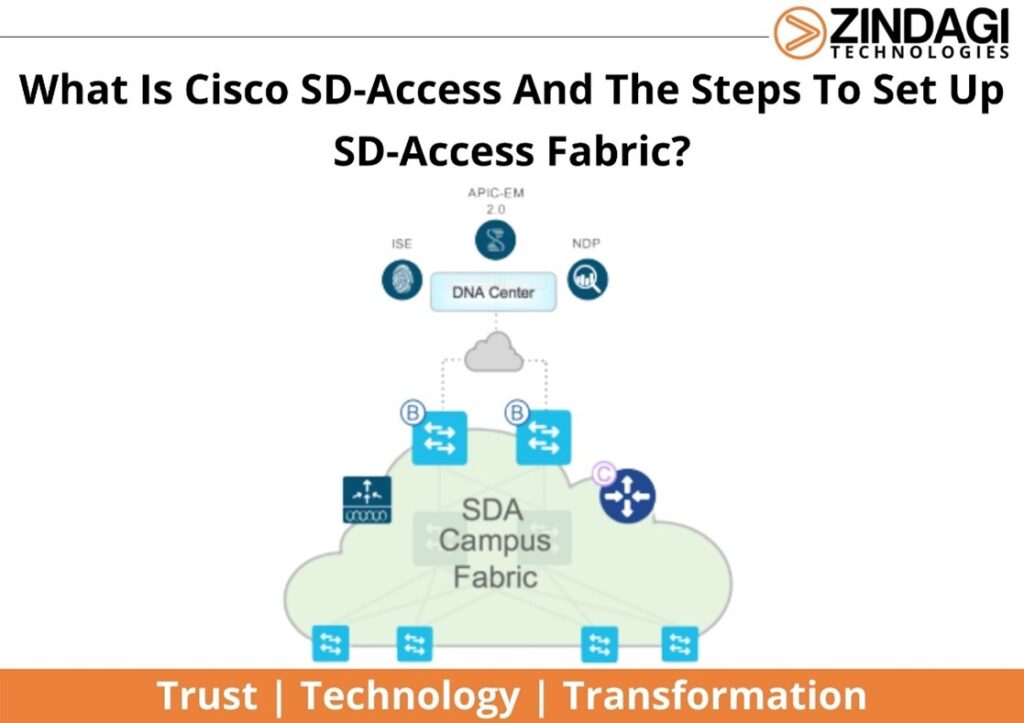
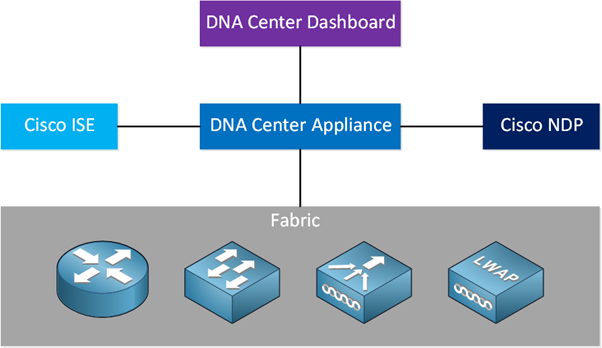
The DNA centre, an integrated dashboard that network managers can use to interface with the software, makes the SD-access services available to users. Three appliances, Identity Service Engine (ISE), Application Policy Infrastructure Controller Enterprise Module (APIC-EM), and Network Data Platform, are connected to the DNA centre and contribute significantly to the functionality of SD-access.
Steps To Set Up SD-Access Fabric Completely
Step 1: Locate All Of The Devices
Using CDP or IP address ranges, the Discovery tool in Cisco DNA Center may locate existing underlay devices. The users will input their ssh and SNMP credentials while creating a discovery profile.
Step 2: Designing The Site, Setting Up The Network, And Creating IP Pools
Customers of various sizes and scales may easily establish their physical Sites and shared network resources with the help of the powerful Design application that Cisco DNA Center offers (DHCP, DNS, etc.). When provisioning devices, this eliminates the need to redefine the same resource many times by employing a hierarchical implementation that is simple to use.
Step 3: Combine ISE And Cisco DNAC.
A crucial part of the Cisco DNA Center is the Identity Services Engine (ISE), which offers Intent Services including AAA (RADIUS and TACACS+), Visibility, On-boarding, Security, Macro, and Micro-Segmentation. To use these services, we must integrate the Cisco DNA Center ISE in order to build confidence between the two parties. The steps are provided in the following tutorial.
Step 4: Create A Group-Based Access List And A Policy
The kinds of network traffic that are allowed or prohibited between scalable groups are determined by security policies. Scalable groups, which offer secure micro-segmentation for SD-Access infrastructure, are a crucial part of the Cisco Software-Defined Access or SD-Access architecture.
Step 5: Install Devices On The Site
All of the parameters that were established during the site’s design are provisioned on the device when the provision phase is carried out (based on Cisco best practices).
Step 6: Create A Fabric Site
A fabric site is a section of the fabric that contains its own collection of edge, border, and control plane nodes.
Step 7. On-Boarding Of Hosts
Host onboarding in SD-Access enables the attachment of endpoints to the fabric nodes. You can authenticate, categorize, and assign an endpoint to a scalable group using the host onboarding workflow, after which you can associate it with an IP pool and virtual network.
Zindagi Technologies is a leading IT consulting company. We have successfully completed lots of IT projects. We provide IT solutions like cyber security, cloud computing, VAPT, VoIP, etc. We can assist you in your network programs. You can ping us at +91-9773973971 or drop us an email so we can get in touch and discuss about the various solutions that we have for you.
Author
Lokesh Kumar
Associate Consultant